Overview
One of the key advantages Podman has over Docker is its native support for pods, a concept borrowed directly from Kubernetes. A pod is a group of one or more containers that share the same network namespace, meaning they can communicate with each other over localhost. This is particularly useful for multi-container applications like WordPress, which requires both a web server and a database running together.
In this lab, I deployed a WordPress application as a Podman pod in two different security contexts:
- A rootless pod (
wp-pod) - running as a regular user for improved security - A rootfull pod (
root-wp-pod) - running as root, which unlocks features likepause/unpause
I also practiced the full pod lifecycle: creating, inspecting, stopping, restarting, and cleaning up pods and their containers.
Environment
This lab was performed on a Red Hat Enterprise Linux 10.1 (Coughlan) instance running on AWS EC2 (t2.medium). Podman comes pre-installed on RHEL, which makes it the natural container runtime choice in Red Hat environments.
$ cat /etc/os-release
NAME="Red Hat Enterprise Linux"
VERSION="10.1 (Coughlan)"
ID="rhel"
PRETTY_NAME="Red Hat Enterprise Linux 10.1 (Coughlan)"
Part 1 - Running a Rootless Pod
Why Rootless?
Running containers without root privileges is a security best practice. If a container is ever compromised, the attacker cannot gain root access to the host. Podman makes this easy and seamless.
Step 1: Verify a Clean Starting State
Before creating anything, I confirmed there were no existing pods or containers.
$ podman ps -a --pod
CONTAINER ID  IMAGE  COMMAND  CREATED  STATUS  PORTS  NAMES  POD ID  PODNAME

$ podman pod ps
POD ID  NAME  STATUS  CREATED  INFRA ID  # OF CONTAINERS
The
--podflag tellspodman psto include two extra columns in the output: POD ID and PODNAME.
Both commands returned empty tables, a clean slate.
Step 2: Create the Pod
I created a pod named wp-pod and mapped port 80 inside the pod to port 8080 on the host. Port mapping is defined at the pod level, not the container level, this is an important difference from standalone containers.
$ podman pod create --name wp-pod -p 8080:80
31d1c0b8b5759ffbafd3d41138fde8432de2383484e3013c37354ae46435d9c1
Immediately after creation, Podman automatically creates an infra container to hold the pod’s network namespace. This is what allows all containers in the pod to share the same network.
$ podman ps -a --pod
CONTAINER ID  IMAGE  COMMAND  CREATED         STATUS   PORTS                 NAMES               POD ID        PODNAME
a4bd5bd79862               19 seconds ago  Created  0.0.0.0:8080->80/tcp  31d1c0b8b575-infra  31d1c0b8b575  wp-pod
Key insight: The infra container is created automatically. It exists solely to maintain the shared network namespace for the pod, you never interact with it directly.
Step 3: Add the MariaDB Database Container
I added a mariadb container to the pod, passing in database credentials via environment variables. Using --pod=wp-pod attaches it to the pod’s shared network.
$ podman run -d --restart=always --pod=wp-pod \
  -e MYSQL_ROOT_PASSWORD="dbpass" \
  -e MYSQL_DATABASE="wp" \
  -e MYSQL_USER="wordpress" \
  -e MYSQL_PASSWORD="wppass" \
  --name=wp-db \
  docker.io/library/mariadb:latest
Podman pulled the image and started the container:
Trying to pull docker.io/library/mariadb:latest...
Getting image source signatures
Copying blob 9728cf7b6840 done   |
...
Writing manifest to image destination
98eae259ed310d92cfbccce6ade528f3f1d0a20381d86cd2ec63815a9ea18d49
Confirming wp-db is now part of the pod:
$ podman ps -a --pod
CONTAINER ID  IMAGE                             COMMAND   CREATED        STATUS        PORTS                           NAMES               POD ID        PODNAME
a4bd5bd79862                                              8 minutes ago  Up 4 minutes  0.0.0.0:8080->80/tcp            31d1c0b8b575-infra  31d1c0b8b575  wp-pod
98eae259ed31  docker.io/library/mariadb:latest  mariadbd  4 minutes ago  Up 4 minutes  0.0.0.0:8080->80/tcp, 3306/tcp  wp-db               31d1c0b8b575  wp-pod
Step 4: Add the WordPress Web Container
Next, I added the WordPress container. Notice that WORDPRESS_DB_HOST is set to 127.0.0.1, because all containers in a pod share the same network namespace, the database is reachable on localhost.
$ podman run -d --restart=always --pod=wp-pod \
  -e WORDPRESS_DB_NAME="wp" \
  -e WORDPRESS_DB_USER="wordpress" \
  -e WORDPRESS_DB_PASSWORD="wppass" \
  -e WORDPRESS_DB_HOST="127.0.0.1" \
  --name wp-web \
  docker.io/library/wordpress:latest
All three containers (infra, wp-db, wp-web) are now running inside wp-pod:
$ podman ps -a --pod
CONTAINER ID  IMAGE                               COMMAND               CREATED         STATUS         PORTS                           NAMES               POD ID        PODNAME
a4bd5bd79862                                                            12 minutes ago  Up 8 minutes   0.0.0.0:8080->80/tcp            31d1c0b8b575-infra  31d1c0b8b575  wp-pod
98eae259ed31  docker.io/library/mariadb:latest    mariadbd              8 minutes ago   Up 8 minutes   0.0.0.0:8080->80/tcp, 3306/tcp  wp-db               31d1c0b8b575  wp-pod
06ee38a6aba0  docker.io/library/wordpress:latest  apache2-foregroun...  37 seconds ago  Up 37 seconds  0.0.0.0:8080->80/tcp            wp-web              31d1c0b8b575  wp-pod
Step 5: Verify the Web Server is Accessible
I used curl to confirm the WordPress server was responding on port 8080. The -s flag suppresses the progress output. A successful response returns an empty body (WordPress redirects to setup), but an exit code of 0 confirms the connection succeeded.
$ curl -s http://localhost:8080

$ echo $?
0
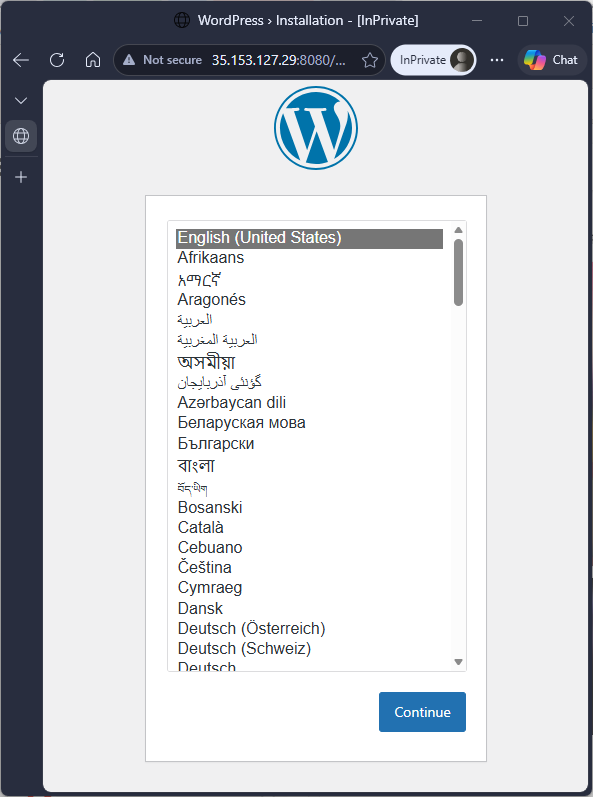
Exit code 0 = success. The WordPress setup page was also verified by navigating to the public IP on port 8080 in a browser.
Part 2 - Running a Rootfull Pod
Why Rootfull?
Some Podman operations, like pausing a container, require root because they depend on kernel cgroup features that are restricted for unprivileged users. The rootfull pod demonstrates these capabilities.
I switched to root and repeated the pod creation process, this time mapping port 80 to 8081:
$ sudo -i

$ podman pod create --name root-wp-pod -p 8081:80
dfe66840c335294a3d47927da4c63179c5c4c3daaadfed5f84e910b8060d0340

$ podman pod ps
POD ID        NAME         STATUS   CREATED        INFRA ID      # OF CONTAINERS
dfe66840c335  root-wp-pod  Created  7 seconds ago  55ba8e7f8155  1
After adding both root-wp-db (MariaDB) and wp-web (WordPress) containers using the same approach as the rootless pod, the rootfull pod was up and verified:
$ podman ps -a --pod
CONTAINER ID  IMAGE                               COMMAND               CREATED         STATUS         PORTS                           NAMES               POD ID        PODNAME
55ba8e7f8155                                                            9 minutes ago   Up 5 minutes   0.0.0.0:8081->80/tcp            dfe66840c335-infra  dfe66840c335  root-wp-pod
099860142a69  docker.io/library/mariadb:latest    mariadbd              5 minutes ago   Up 5 minutes   0.0.0.0:8081->80/tcp, 3306/tcp  root-wp-db          dfe66840c335  root-wp-pod
94adf6dd7eed  docker.io/library/wordpress:latest  apache2-foregroun...  32 seconds ago  Up 32 seconds  0.0.0.0:8081->80/tcp            wp-web              dfe66840c335  root-wp-pod

$ curl -s http://localhost:8081
$ echo $?
0
Part 3 - Managing the Rootless Pod (wp-pod)
Stop, Start, and Restart
One of the key benefits of pods is that lifecycle commands apply to all containers at once. Rather than stopping each container individually, a single command manages the whole pod.
# Stop all containers in the pod
$ podman pod stop wp-pod

$ podman ps -a --pod
CONTAINER ID  IMAGE                               COMMAND               CREATED         STATUS                     PORTS                           NAMES
a4bd5bd79862  ...                                                        30 minutes ago  Exited (0) 10 seconds ago  0.0.0.0:8080->80/tcp            31d1c0b8b575-infra
98eae259ed31  docker.io/library/mariadb:latest    mariadbd              26 minutes ago  Exited (0) 10 seconds ago  ...                             wp-db
06ee38a6aba0  docker.io/library/wordpress:latest  apache2-foregroun...  18 minutes ago  Exited (0) 10 seconds ago  ...                             wp-web
All three containers transitioned to Exited simultaneously.
# Start them all back up
$ podman pod start wp-pod
wp-pod

# Restart (stop + start in one command)
$ podman pod restart wp-pod
31d1c0b8b5759ffbafd3d41138fde8432de2383484e3013c37354ae46435d9c1
After restart, all containers show fresh uptime:
$ podman ps -a --pod
CONTAINER ID  IMAGE                               COMMAND               CREATED         STATUS         PORTS
a4bd5bd79862  ...                                                        32 minutes ago  Up 10 seconds  0.0.0.0:8080->80/tcp
98eae259ed31  docker.io/library/mariadb:latest    mariadbd              28 minutes ago  Up 10 seconds  0.0.0.0:8080->80/tcp, 3306/tcp
06ee38a6aba0  docker.io/library/wordpress:latest  apache2-foregroun...  20 minutes ago  Up 9 seconds   0.0.0.0:8080->80/tcp
Inspecting the Pod
podman pod inspect gives a detailed JSON view of the pod’s configuration, creation time, port bindings, cgroup paths, and the list of containers with their IDs and states.
$ podman pod inspect wp-pod | more
[
     {
          "Id": "31d1c0b8b5759ffbafd3d41138fde8432de2383484e3013c37354ae46435d9c1",
          "Name": "wp-pod",
          "Created": "2026-05-14T12:58:16.711215479Z",
          "State": "Running",
          "InfraConfig": {
               "PortBindings": {
                    "80/tcp": [{ "HostIp": "0.0.0.0", "HostPort": "8080" }]
               }
          },
          "NumContainers": 3,
          "Containers": [
               { "Id": "a4bd5bd7...", "Name": "31d1c0b8b575-infra", "State": "running" },
               { "Id": "98eae259...", "Name": "wp-db",              "State": "running" },
               { "Id": "06ee38a6...", "Name": "wp-web",             "State": "running" }
          ]
     }
]
podman pod top shows all processes running across every container in the pod, useful for verifying services are actually running:
$ podman pod top wp-pod
USER      PID  PPID  %CPU  ELAPSED          TTY  TIME  COMMAND
0         1    0     0.000 5m0.709282336s   ?    0s    /catatonit -P
mysql     1    0     0.665 5m0.710179973s   ?    2s    mariadbd
root      1    0     0.000 4m59.71151296s   ?    0s    apache2 -DFOREGROUND
www-data  14   1     0.000 4m59.711601996s  ?    0s    apache2 -DFOREGROUND
www-data  15   1     0.000 4m59.711669913s  ?    0s    apache2 -DFOREGROUND
What I see here: The infra container runs
catatonit(a minimal init process), MariaDB runs as themysqluser, and Apache (WordPress) runs asrootthen forks worker processes aswww-data. All of this is visible from a single command.
Killing and Removing the Pod
When it’s time to tear down a pod, podman pod kill sends a signal to stop all containers (forcing an immediate stop), and podman pod rm removes the pod and all its containers in one shot.
$ podman pod kill wp-pod
31d1c0b8b5759ffbafd3d41138fde8432de2383484e3013c37354ae46435d9c1

$ podman pod ps
POD ID        NAME    STATUS  CREATED         INFRA ID      # OF CONTAINERS
31d1c0b8b575  wp-pod  Exited  39 minutes ago  a4bd5bd79862  3

$ podman pod rm wp-pod
31d1c0b8b5759ffbafd3d41138fde8432de2383484e3013c37354ae46435d9c1

$ podman pod ps
POD ID  NAME  STATUS  CREATED  INFRA ID  # OF CONTAINERS
Pod and all containers are gone.
Part 4 - Managing the Rootfull Pod (root-wp-pod)
Pause and Unpause (Rootfull Only)
This is a feature exclusive to rootfull containers. Pausing freezes all processes in the pod using Linux cgroups, the containers remain in memory but stop consuming CPU. This is useful for temporarily suspending workloads without losing their state.
$ podman pod pause root-wp-pod
dfe66840c335294a3d47927da4c63179c5c4c3daaadfed5f84e910b8060d0340

$ podman ps -a --pod
CONTAINER ID  IMAGE                               COMMAND               STATUS   NAMES
55ba8e7f8155  ...                                                        Paused   dfe66840c335-infra
099860142a69  docker.io/library/mariadb:latest    mariadbd              Paused   root-wp-db
94adf6dd7eed  docker.io/library/wordpress:latest  apache2-foregroun...  Paused   wp-web
All three containers show Paused. Resuming is just as simple:
$ podman pod unpause root-wp-pod
dfe66840c335294a3d47927da4c63179c5c4c3daaadfed5f84e910b8060d0340
Live Resource Statistics
podman pod stats streams real-time CPU and memory usage for every container in the pod, similar to docker stats but at the pod level.
$ podman pod stats root-wp-podPOD CID NAME CPU % MEM USAGE / LIMIT MEM % NET IO BLOCK IO PIDS
dfe66840c335 55ba8e7f8155 dfe66840c335-infra 0.00% 233.5kB / 3.828GB 0.01% 2.852kB / 1.842kB -- / -- 1
dfe66840c335 099860142a69 root-wp-db 0.26% 129.5MB / 3.828GB 3.38% 2.852kB / 1.842kB 6.085MB / 25.59MB 8
dfe66840c335 94adf6dd7eed wp-web 0.06% 35.2MB / 3.828GB 0.92% 2.852kB / 1.842kB 0B / 84.74MB 7
What I see: The database (
root-wp-db) is the heaviest consumer at ~129 MB RAM and 0.26% CPU, while the WordPress Apache server uses only ~35 MB. The infra container is nearly invisible at 233 KB, just holding the network namespace open.
Part 5 - Cleanup and Storage Reclamation
After stopping the pods, I used a two-step cleanup process to reclaim disk space.
Step 1: podman pod prune - Remove Stopped Pods
$ podman pod prune
WARNING! This will remove all stopped/exited pods..
Are you sure you want to continue? [y/N] y
This removes pod metadata and container layers, but images remain cached.
Step 2: podman system prune -a - Remove Everything Else
$ podman system prune -a
WARNING! This command removes:
        - all stopped containers
        - all networks not used by at least one container
        - all images without at least one container associated with them
        - all build cache

Are you sure you want to continue? [y/N] y
Deleted Images
8431e30f98d8c6e37655557914320bdc56eabdda0f18501fd31b4cfc9942d7ec
fe25111d923f83698454de718683c488c1166becc290c607df37b540d6ecfaa1
Total reclaimed space: 1.108GB
Verifying everything is clean:
$ podman system df
TYPE           TOTAL  ACTIVE  SIZE  RECLAIMABLE
Images         0      0       0B    0B (0%)
Containers     0      0       0B    0B (0%)
Local Volumes  0      0       0B    0B (0%)
1.1 GB reclaimed, back to a clean state.
Commands Summary
| Command | Purpose |
|---|---|
podman pod create --name <name> -p <host>:<container> | Create a new pod with port mapping |
podman pod ps | List all pods |
podman ps -a --pod | List all containers and their pod membership |
podman run --pod=<name> ... | Start a container inside a pod |
podman pod stop <name> | Gracefully stop a pod and all its containers |
podman pod start <name> | Start a stopped pod and all its containers |
podman pod restart <name> | Restart a pod and all its containers |
podman pod kill <name> | Force-kill a pod and all its containers |
podman pod rm <name> | Remove a pod and all its containers |
podman pod pause <name> | Pause all processes in a pod (rootfull only) |
podman pod unpause <name> | Resume a paused pod |
podman pod inspect <name> | Show detailed JSON configuration of a pod |
podman pod top <name> | Show all running processes across a pod |
podman pod stats <name> | Stream live CPU/memory stats for a pod |
podman pod prune | Remove all stopped pods |
podman system prune -a | Remove all unused containers, images, and networks |
podman system df | Show disk usage by images, containers, and volumes |
Key Takeaways
- Pods share a network namespace. Containers within the same pod communicate over
localhost, which is whyWORDPRESS_DB_HOST=127.0.0.1works without any service discovery. - Port mapping belongs to the pod. You define
-pat pod creation time, not on individual containers. All containers in the pod share those published ports. - Rootless = better security. Running pods without root limits the blast radius if a container is compromised.
- Pause/unpause requires root. Freezing processes via cgroups is a privileged operation not available to rootless containers.
- Podman pods mirror Kubernetes pods. The mental model, shared network, infra container, multi-container lifecycle, maps directly to how Kubernetes pods work, making this excellent preparation for k8s.