(old Project 7)
Note
Implementing a web solution where several stateless Web Servers share a common database and also access the same files using Network File System (NFS) as a shared file storage. Even though the NFS server might be located on a completely separate hardware – for Web Servers it look like a local file system from where they can serve the same files.
Technologies/Tools used:
- AWS (EC2)(EBS)
- Red Hat Enterprise Linux 8 (HVM)
- MySQL
- GitBash
To start I will we using my AWS account to create an EC2 instance with Red-Hat as the OS. This will become my NFS Server.
Use link: Creating Red Hat instance in AWS
Following the same steps I did for a previous project WEB-SOLUTION-WITH-WORDPRESS I will create 3 Elastic Block Store Volumes to attach to the NFS Server. Unlike the previous project this we’ll format the disks as xfs instead of ext4. We need to end up with 3 Logical Volumes
- lv-apps to be mounted on mnt/apps - To be used by webservers
- lv-logs to be mounted on mnt/logs - To be used by webserver logs
- lv-opt to be mounted on /mnt/opt - To be used by Jenkins server later project
After partitioning the EBS Volumes
[ec2-user@ip-172-31-93-202 ~]$ sudo lvmdiskscan
  /dev/xvda2 [     <10.00 GiB]
  /dev/xvdf1 [     <10.00 GiB]
  /dev/xvdg1 [     <10.00 GiB]
  /dev/xvdh1 [     <10.00 GiB]
  0 disks
  4 partitions #3 newly create + already existing one xvda2
  0 LVM physical volume whole disks
  0 LVM physical volumes

[ec2-user@ip-172-31-93-202 ~]$
Creating Physical Volumes
[ec2-user@ip-172-31-88-22 ~]$ sudo pvcreate /dev/xvdf1
  Physical volume "/dev/xvdf1" successfully created.
[ec2-user@ip-172-31-88-22 ~]$ sudo pvcreate /dev/xvdg1
  Physical volume "/dev/xvdg1" successfully created.
[ec2-user@ip-172-31-88-22 ~]$ sudo pvcreate /dev/xvdh1
  Physical volume "/dev/xvdh1" successfully created.
[ec2-user@ip-172-31-88-22 ~]$
Checking newly created Physical Volumes
[ec2-user@ip-172-31-93-202 ~]$ sudo lvmdiskscan
  /dev/xvda2 [     <10.00 GiB]
  /dev/xvdf1 [     <10.00 GiB] LVM physical volume #here
  /dev/xvdg1 [     <10.00 GiB] LVM physical volume #here
  /dev/xvdh1 [     <10.00 GiB] LVM physical volume #here
  0 disks
  1 partition
  0 LVM physical volume whole disks
  3 LVM physical volumes #Total

[ec2-user@ip-172-31-93-202 ~]$
Turning each Physical Volume into a Volume Group
[ec2-user@ip-172-31-88-22 ~]$ sudo vgcreate vg-apps /dev/xvdf1
  Volume group "vg-apps" successfully created
[ec2-user@ip-172-31-88-22 ~]$ sudo vgcreate vg-logs /dev/xvdg1
  Volume group "vg-logs" successfully created
[ec2-user@ip-172-31-88-22 ~]$ sudo vgcreate vg-opt /dev/xvdh1
  Volume group "vg-opt" successfully created
[ec2-user@ip-172-31-88-22 ~]$
Checking newly created Volume Groups with vgs
[ec2-user@ip-172-31-93-202 ~]$ sudo vgs
  VG      #PV #LV #SN Attr   VSize   VFree
  vg-apps   1   0   0 wz--n- <10.00g <10.00g
  vg-logs   1   0   0 wz--n- <10.00g <10.00g
  vg-opt    1   0   0 wz--n- <10.00g <10.00g
[ec2-user@ip-172-31-93-202 ~]$
Turning each Volume Group to a Logical Volume
#-l 100%VG, ensures 100% of avaiable space of VG is used
[ec2-user@ip-172-31-93-202 ~]$ sudo lvcreate -l 100%VG -n lv-apps vg-apps
  Logical volume "lv-apps" created.
[ec2-user@ip-172-31-93-202 ~]$ sudo lvcreate -l 100%VG -n lv-logs vg-logs
  Logical volume "lv-logs" created.
[ec2-user@ip-172-31-93-202 ~]$ sudo lvcreate -l 100%VG -n lv-opt vg-opt
  Logical volume "lv-opt" created.

[ec2-user@ip-172-31-93-202 ~]$
Checking newly created Logical Volumes with lvs
[ec2-user@ip-172-31-93-202 ~]$ sudo lvs
  LV      VG      Attr       LSize   Pool Origin Data%  Meta%  Move Log Cpy%Sync Convert
  lv-apps vg-apps -wi-a----- <10.00g
  lv-logs vg-logs -wi-a----- <10.00g
  lv-opt  vg-opt  -wi-a----- <10.00g
[ec2-user@ip-172-31-93-202 ~]$
Creating mounting points (directories)
[ec2-user@ip-172-31-93-202 ~]$ sudo mkdir /mnt/apps
[ec2-user@ip-172-31-93-202 ~]$ sudo mkdir /mnt/logs
[ec2-user@ip-172-31-93-202 ~]$ sudo mkdir /mnt/opt
[ec2-user@ip-172-31-93-202 ~]$ ls /mnt/
apps  logs  opt # < newly created
[ec2-user@ip-172-31-93-202 ~]$
We can take a broader look with lsblk
[ec2-user@ip-172-31-93-202 ~]$ sudo lsblk
NAME                  MAJ:MIN RM SIZE RO TYPE MOUNTPOINT
xvda                  202:0    0  10G  0 disk
├─xvda1               202:1    0   1M  0 part
└─xvda2               202:2    0  10G  0 part /
xvdf                  202:80   0  10G  0 disk #Device/Volume
└─xvdf1               202:81   0  10G  0 part #Partition
  └─vg--apps-lv--apps 253:0    0  10G  0 lvm  #VolumeGroup-LogicalVolume
xvdg                  202:96   0  10G  0 disk
└─xvdg1               202:97   0  10G  0 part
  └─vg--logs-lv--logs 253:1    0  10G  0 lvm
xvdh                  202:112  0  10G  0 disk
└─xvdh1               202:113  0  10G  0 part
  └─vg--opt-lv--opt   253:2    0  10G  0 lvm
[ec2-user@ip-172-31-93-202 ~]$
Formatting the Logical Volumes to xfs
[ec2-user@ip-172-31-93-202 ~]$ sudo mkfs.xfs /dev/vg-apps/lv-apps
[ec2-user@ip-172-31-93-202 ~]$ sudo mkfs.xfs /dev/vg-logs/lv-logs
[ec2-user@ip-172-31-93-202 ~]$ sudo mkfs.xfs /dev/vg-opt/lv-opt
[ec2-user@ip-172-31-93-202 ~]$
Manual Mount
sudo mount /dev/vg-apps/lv-apps /mnt/apps/
sudo mount /dev/vg-logs/lv-logs /mnt/logs/
sudo mount /dev/vg-opt/lv-opt /mnt/opt/
Adding mounts to fstab after getting Logical Volume UUID using blkid
UUID=Suffs0-E50z-6bwx-kCFk-5cfN-ecnI-3s0Xm4 /mnt/apps             xfs     defaults        0 0
UUID=BAPXhu-XZ0I-S0Go-0uAT-EcFj-KJzX-6etnCA /mnt/logs             xfs     defaults        0 0
UUID=LuEjkp-3IbF-9C3n-2TuM-21Qe-fR95-Frwfar /mnt/opt              xfs     defaults        0 0
Use sudo mount -a check for errors
Lets set up permissions that will allow our Web servers to read, write and execute files on NFS:
Installing NFS server, configure to start on reboot and make sure it is up and running
sudo yum -y update
sudo yum install nfs-utils -y
sudo systemctl start nfs-server.service
sudo systemctl enable nfs-server.service #start on boot
sudo systemctl status nfs-server.service
We set up permission that will allow our Web servers to read, write and execute files on NFS
sudo chown -R nobody: /mnt/apps #changes user and group to nobody, a way to tell the kernel that any user can read and write access to the file
sudo chown -R nobody: /mnt/logs
sudo chown -R nobody: /mnt/opt
sudo chmod -R 777 /mnt/apps
sudo chmod -R 777 /mnt/logs
sudo chmod -R 777 /mnt/opt
sudo systemctl restart nfs-server.service
[ec2-user@ip-172-31-88-22 ~]$ ls -l /mnt/
total 0
drwxrwxrwx. 2 nobody nobody 6 Sep 22 00:18 apps
drwxrwxrwx. 2 nobody nobody 6 Sep 22 00:18 logs
drwxrwxrwx. 2 nobody nobody 6 Sep 22 00:18 opt
[ec2-user@ip-172-31-88-22 ~]$For simplicity, in this project all Instances (tiers) are inside the same subnet Now I need to check which subnet my NFS Server is in
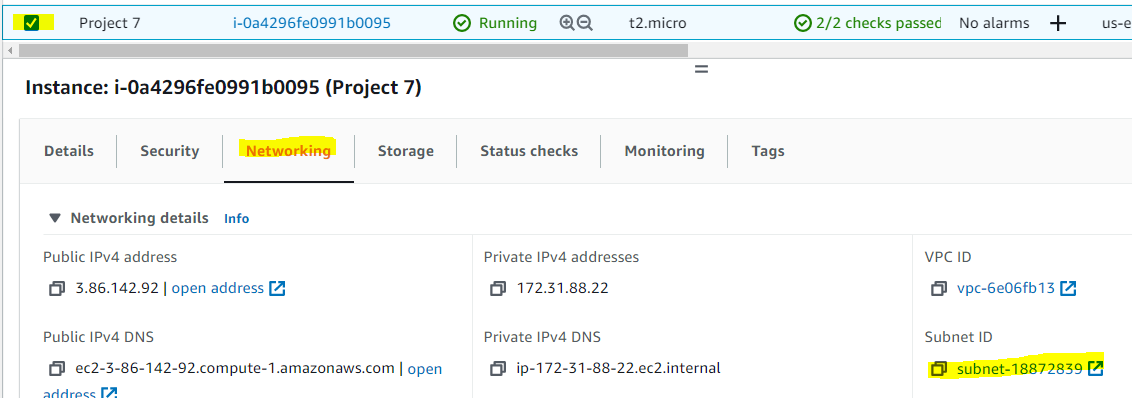

As we can see IPv4 CIDR is 172.31.80.0/20
Configuring access to NFS for clients within the same subnet
[ec2-user@ip-172-31-88-22 ~]$ sudo vi /etc/exports #edit this file
[ec2-user@ip-172-31-88-22 ~]$ cat /etc/exports
/mnt/apps 172.31.80.0/20(rw,sync,no_all_squash,no_root_squash) #added
/mnt/logs 172.31.80.0/20(rw,sync,no_all_squash,no_root_squash) #added
/mnt/opt 172.31.80.0/20(rw,sync,no_all_squash,no_root_squash) #added
[ec2-user@ip-172-31-88-22 ~]$ sudo exportfs -arv #used to maintain the current table of exported file systems for NFS
exporting 172.31.80.0/20:/mnt/opt
exporting 172.31.80.0/20:/mnt/logs
exporting 172.31.80.0/20:/mnt/apps
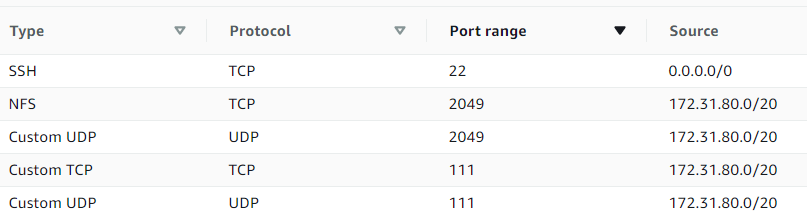
[ec2-user@ip-172-31-88-22 ~]$Now we make sure the following ports are open to hosts from the same subnet 172.31.80.0/20
Use link:
Opening Ports in AWS
CONFIGURE THE DATABASE SERVER
The following takes place in NFS Server
sudo yum install mysql-server -y #Installation
sudo mysql_secure_installation #additional setup

sudo systemctl start mysqld #starting it

sudo mysql #to access MySQL
Creating a database called tooling and user webaccess with all priviledges from subnet 172.31.80.0/20
mysql> CREATE DATABASE `tooling`;
Query OK, 1 row affected (0.01 sec)

mysql> CREATE USER `webaccess`@`172.31.80.0/20` IDENTIFIED WITH mysql_native_password BY 'Passw0rd!'
Query OK, 0 rows affected (0.00 sec)

mysql> GRANT ALL ON tooling.* TO 'webaccess'@'172.31.80.0/20';
Query OK, 0 rows affected (0.00 sec)
Make sure to also open port 3306 Type TCP and restrict accesss(resource) to subnet 172.31.80.0/20
Opening Ports in AWS
PREPARE THE WEB SERVERS
We need to make sure that our Web Servers can serve the same content from shared storage solutions, in this case NFS Server and MySQL database. This means we will be able to add new ones or remove them whenever we need, and the integrity of the data (in the database and on NFS) will be preserved making the webservers stateless
We will utilize NFS and mount previously created Logical Volume lv-apps (via mnt/apps) to the folder where Apache stores files to be served to the users /var/www.
The following steps can be repeated in as many servers as needed.
Install NFS client
yum update -y
sudo yum install nfs-utils nfs4-acl-tools -y
Mouning /mnt/apps in NFS server to our local /var/www
sudo mkdir /var/www #
sudo mount -t nfs -o rw,nosuid 172.31.88.22:/mnt/apps /var/www
#line to add in /etc/fstab for mount to persists after boot
172.31.88.22:/mnt/apps /var/www nfs defaults 0 0
Testing the mount
#Webserver
[ec2-user@ip-172-31-82-171 www]$ ls
[ec2-user@ip-172-31-82-171 www]$ touch CreatedFromNoneRemote #creating file
[ec2-user@ip-172-31-82-171 www]$ ls
CreatedFromNoneRemote
[ec2-user@ip-172-31-82-171 www]$

#NFS Server
[ec2-user@ip-172-31-88-22 ~]$ cd /mnt/apps/
[ec2-user@ip-172-31-88-22 apps]$ ls
CreatedFromNoneRemote #file appears
[ec2-user@ip-172-31-88-22 apps]$
Installing Apache
sudo yum install httpd -yAfter install I can see html folder from NFS Server
#NFS Server
[ec2-user@ip-172-31-88-22 apps]$ ls /mnt/apps/
html
[ec2-user@ip-172-31-88-22 apps]$
Open TCP port 80 on the Web Server.
Use link:
Opening Ports in AWS
Disable SELinux
sudo setenforce 0
#to make it permanent set SELINUX=disabled in /etc/sysconfig/selinux
Note 2: If you encounter 403 Error – check permissions to your /var/www/html folder
Mounting /mnt/logs in NFS Server to local (webserver) /var/log/httpd/
sudo mount -t nfs -o rw,nosuid 172.31.88.22:/mnt/logs /var/log/httpd/Testing the mount
#This time creating file on NFS Server
[ec2-user@ip-172-31-88-22 apps]$ cd /mnt/logs/
[ec2-user@ip-172-31-88-22 logs]$ ls
[ec2-user@ip-172-31-88-22 logs]$ touch ThisIsALog #creating file
[ec2-user@ip-172-31-88-22 logs]$ ls
ThisIsALog
[ec2-user@ip-172-31-88-22 logs]$


#Webserver
[ec2-user@ip-172-31-86-103 ~]$ ls /var/log/httpd/
ThisIsALog #I see the file
[ec2-user@ip-172-31-86-103 ~]$
Start Apache
sudo systemctl start httpdTesting page hosting
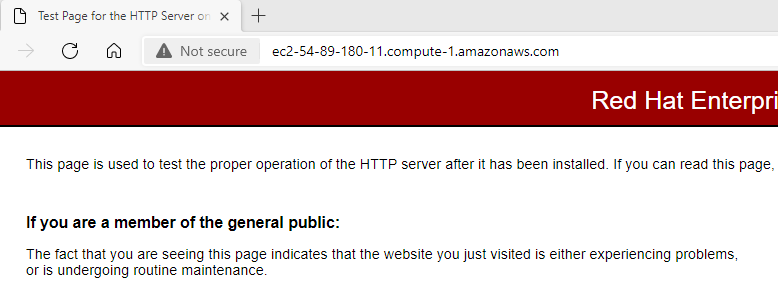
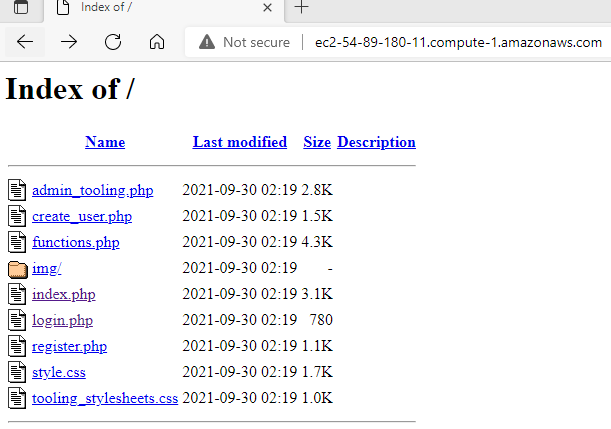
From repo tooling.git I will get directory /html and put it in our local /var/www/ to host a different test site.
Now I will disable the default site in Apache by renaming a file welcome.config
[ec2-user@ip-172-31-86-103 ~]$ sudo mv /etc/httpd/conf.d/welcome.conf /etc/httpd/conf.d/welcome.backup
[ec2-user@ip-172-31-86-103 ~]$ cd /etc/httpd/conf.d/
[ec2-user@ip-172-31-86-103 conf.d]$ ls
autoindex.conf  README  userdir.conf  welcome.backup
[ec2-user@ip-172-31-86-103 conf.d]$ sudo systemctl restart httpd #restarting after edit
Now when I test the site
For the site to connect to we need to configure database information in functions.php
// connect to database
//NFS Server IP, Database and User we created earlier
$db = mysqli_connect('172.31.88.22', 'webaccess', 'Passw0rd!', 'tooling');
Also for simplicity I will comment out a portion of the code that converts passwords to hash before saving them in the database (in functions.php)
#line 122
#$password = md5($password);
Now we run SQL script tooling-db.sql in NFS Server found in repo tooling
#To run locally in NFS Server
sudo mysql tooling < tooling-db.sql
#To run remotely from webserver
sudo mysql -h 172.31.88.22 -u webaccess -p tooling < tooling-db.sql
Script creates a table users in database tooling and creates an entry for admin (not going to use this user)
sudo mysqld #Checking mysql in NFS Servermysql> use tooling;
Reading table information for completion of table and column names
You can turn off this feature to get a quicker startup with -A
Database changed
mysql> show tables;
+-------------------+
| Tables_in_tooling |
+-------------------+
| users |
+-------------------+
1 row in set (0.00 sec)
mysql> desc users;
+-----------+--------------+------+-----+---------+----------------+
| Field | Type | Null | Key | Default | Extra |
+-----------+--------------+------+-----+---------+----------------+
| id | int | NO | PRI | NULL | auto_increment |
| username | varchar(255) | NO | | NULL | |
| password | varchar(255) | NO | | NULL | |
| email | varchar(255) | NO | | NULL | |
| user_type | varchar(255) | NO | | NULL | |
| status | varchar(10) | NO | | NULL | |
+-----------+--------------+------+-----+---------+----------------+
6 rows in set (0.00 sec)
mysql> select * FROM users;
+----+----------+----------------------------------+---------------+-----------+--------+
| id | username | password | email | user_type | status |
+----+----------+----------------------------------+---------------+-----------+--------+
| 1 | admin | 21232f297a57a5a743894a0e4a801fc3 | dare@dare.com | admin | 1 |
+----+----------+----------------------------------+---------------+-----------+--------+
1 row in set (0.00 sec) We wont be using password saved as hash so I will make another entry
mysql> INSERT INTO `users` (`id`, `username`, `password`, `email`, `user_type`, `status`) VALUES (2, 'myuser2', '1234', 'user@mail.com', 'admin', '1
');
Query OK, 1 row affected (0.00 sec)
mysql>mysql> select * from users;
+----+----------+----------------------------------+---------------+-----------+--------+
| id | username | password | email | user_type | status |
+----+----------+----------------------------------+---------------+-----------+--------+
| 1 | admin | 21232f297a57a5a743894a0e4a801fc3 | dare@dare.com | admin | 1 |
| 2 | myuser2 | 1234 | user@mail.com | admin | 1 |
+----+----------+----------------------------------+---------------+-----------+--------+Before trying to login with this user we need make sure we have PHP installed in webservers
#Install the EPEL repository
sudo dnf install https://dl.fedoraproject.org/pub/epel/epel-release-latest-8.noarch.rpm
#Install yum utils #dnf is a package manager
sudo dnf install dnf-utils http://rpms.remirepo.net/enterprise/remi-release-8.rpm
#Reset the PHP modules.
sudo dnf module reset php
#Enabling the PHP 7.4 module
sudo dnf module enable php:remi-7.4
#Install PHP, PHP-FPM (FastCGI Process Manager) and associated PHP modules
sudo dnf install php php-opcache php-gd php-curl php-mysqlnd
#To verify the version installed and confirm installation
php -v

#Start and enable PHP-FPM on boot-up.
sudo systemctl start php-fpm
sudo systemctl enable php-fpm

#You might need to instruct SELinux to allow Apache to execute the PHP code via PHP-FPM run
setsebool -P httpd_execmem 1

#Restart Apache web server for PHP to work with Apache web server.
$ sudo systemctl restart httpd
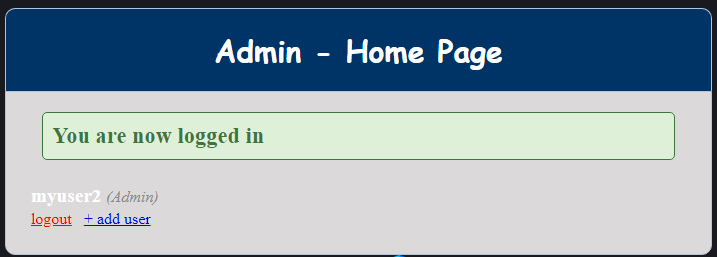
Now I’ll test the login page accessing it with any browser using Public IP of my webserver instance