~~(original Project 22)
Overview
In this project I deploy and configure an Nginx web server inside an Amazon EKS (Elastic Kubernetes Service) cluster. The goal is to get hands-on experience with core Kubernetes objects, Pods, Services, ReplicaSets, and Deployments, while understanding how they interact to keep applications running reliably at scale. I also explore the ephemeral nature of Pods and what that means for data persistence.
Tools & Technologies: Kubernetes · Amazon EKS · AWS CLI · CloudFormation · kubectl · Nginx
Key Concepts
Before diving into the steps it helps to understand a few Kubernetes fundamentals that come up throughout the project:
- Service objects route external or internal traffic to the correct Pods. They use selector labels to find matching Pods, so a Pod must carry the right label to receive traffic from a given Service.
- The default Service type is ClusterIP, which acts as an internal load balancer, it is only reachable from inside the cluster.
- Pods receive virtual IP addresses from the Kubernetes network plugin. These IPs are separate from the node’s IP and change every time a Pod is recreated, which is why relying on a Pod IP directly is a bad practice.
- A NodePort Service exposes an application on a static port (range 30000–32767) on each node’s public IP, useful when no cloud load balancer is available. The NodePort range must be open in the EC2 Security Group.
- A ReplicaSet (RS) ensures a stable, declared number of Pod replicas are always running.
Setting Up Kubernetes on AWS (EKS)
Creating the VPC Stack
I start by provisioning the networking layer with an AWS CloudFormation stack. This creates the VPC with public and private subnets that the EKS cluster will live inside.
aws cloudformation create-stack \
  --region us-east-1 \
  --stack-name my-eks-vpc-stack \
  --template-url https://s3.us-west-2.amazonaws.com/amazon-eks/cloudformation/2020-10-29/amazon-eks-vpc-private-subnets.yaml
Output:
{
    "StackId": "arn:aws:cloudformation:us-east-1:199055125796:stack/my-eks-vpc-stack/1fbf1cc0-1842-11ed-b05c-0e1c47e12f6b"
}
Creating the IAM Cluster Role
EKS needs permission to call other AWS services (like EC2 and ELB) on our behalf. I create a dedicated IAM role and attach the required managed policy to it.
Step 1 - Create the trust policy file (cluster-role-trust-policy.json). This tells AWS that the EKS service is allowed to assume this role:
{
  "Version": "2012-10-17",
  "Statement": [
    {
      "Effect": "Allow",
      "Principal": {
        "Service": "eks.amazonaws.com"
      },
      "Action": "sts:AssumeRole"
    }
  ]
}
Step 2 - Create the role using --assume-role-policy-document to attach the trust policy at creation time:
aws iam create-role \
  --role-name myAmazonEKSClusterRole \
  --assume-role-policy-document file://"cluster-role-trust-policy.json"
Output:
{
    "Role": {
        "Path": "/",
        "RoleName": "myAmazonEKSClusterRole",
        "RoleId": "AROAS4WE4FUSEZXBGIH4R",
        "Arn": "arn:aws:iam::199055125796:role/myAmazonEKSClusterRole",
        "CreateDate": "2022-07-26T13:26:57Z"
    }
}
Step 3 - Attach the AmazonEKSClusterPolicy managed policy to grant the role its EKS permissions:
aws iam attach-role-policy \
  --policy-arn arn:aws:iam::aws:policy/AmazonEKSClusterPolicy \
  --role-name myAmazonEKSClusterRole
No output on success, an empty response from attach-role-policy confirms the policy was attached.
Creating the EKS Cluster
With the VPC and IAM role ready, I create the EKS cluster via the AWS CLI, referencing the subnet IDs from the CloudFormation stack and the role ARN from the previous step:
aws eks create-cluster \
  --profile kube \
  --region us-east-1 \
  --name Project22 \
  --kubernetes-version 1.22 \
  --role-arn arn:aws:iam::199055125796:role/myAmazonEKSClusterRole \
  --resources-vpc-config subnetIds=subnet-039252ecb19e19d4e,subnet-09d3ea8fadca3b869,subnet-0c015424187074885,subnet-040dadfc9ad38ed59
Output (abbreviated):
CLUSTER  arn:aws:eks:us-east-1:199055125796:cluster/Project22  Project22  CREATING  1.22
KUBERNETESNETWORKCONFIG  ipv4  10.100.0.0/16
RESOURCESVPCCONFIG  vpc-0b531a7a1ca65e1c8
The CREATING status confirms the cluster is being provisioned. In the AWS Console, the role created earlier appears as a selectable option during the cluster wizard, which is a good way to visually verify everything is wired up correctly.
Configuring kubectl to Communicate with the Cluster
Once the cluster is active, I need to point my local kubectl at it. I first delete the old kubeconfig file at ~/.kube/config to avoid stale contexts, then run the update-kubeconfig command to generate a fresh one:
aws eks update-kubeconfig --profile kube --region us-east-1 --name Project22Output:
Added new context arn:aws:eks:us-east-1:199055125796:cluster/Project22 to /home/hector/.kube/config
I can verify connectivity with kubectl cluster-info, which returns the control plane and CoreDNS endpoints:
kubectl cluster-infoOutput:
Kubernetes control plane is running at https://522B9ADEF131F42CC77EB11C3FB33A42.gr7.us-east-1.eks.amazonaws.com
CoreDNS is running at https://...eks.amazonaws.com/api/v1/namespaces/kube-system/services/kube-dns:dns/proxy

Troubleshooting: Pods Stuck in Pending State
After configuring kubectl I tried to create a Pod, but it stayed in Pending status indefinitely.
Root cause: The cluster had no worker nodes. In EKS, the control plane is managed by AWS, but worker nodes must be added separately. A Pending Pod means Kubernetes has accepted the request but cannot find a node with the resources to run it.
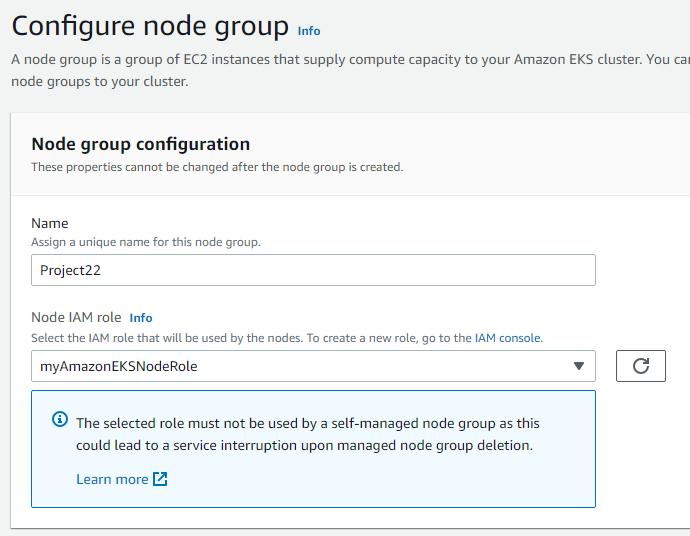
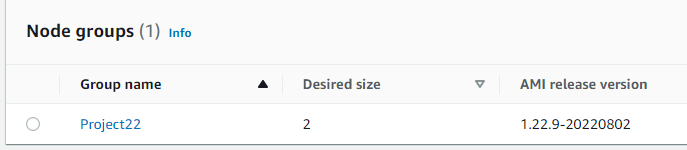
Fix: I created a Node Group through the AWS Console, which provisions EC2 instances and registers them as worker nodes in the cluster. Once the Node Group was active, newly created Pods could be scheduled and transitioned to Running.
# After the Node Group was created, applying a pod manifest now succeeds
kubectl apply -f nginx-pod.yaml
# pod/nginx-pod created

kubectl get pods -o wide
Output:
NAME        READY   STATUS    RESTARTS   AGE   IP               NODE
nginx-pod   1/1     Running   0          31s   192.168.13.153   ip-192-168-10-26.ec2.internal
Deploying and Accessing Nginx
Creating the Nginx Pod
With worker nodes available, I define the Nginx Pod in a YAML manifest. The containerPort: 80 declaration is informational, it tells Kubernetes which port the container listens on, but does not expose it outside the cluster by itself.
# nginx-pod.yaml
apiVersion: v1
kind: Pod
metadata:
  name: nginx-pod
  labels:
    app: nginx-pod
spec:
  containers:
  - image: nginx:latest
    name: nginx-pod
    ports:
    - containerPort: 80
      protocol: TCP
kubectl apply -f nginx-pod.yaml
# pod/nginx-pod created
kubectl get podsOutput:
NAME        READY   STATUS    RESTARTS   AGE
nginx-pod   1/1     Running   0          19m
Why not use the Pod’s IP directly? Pods are ephemeral, when one dies and is replaced, it receives a new IP address. Any client hard-coded to the old IP breaks. Kubernetes solves this with a Service object that provides a stable DNS name and IP regardless of which Pod instances are behind it.
Creating the ClusterIP Service
I create a Service manifest that selects the Nginx Pod using its app: nginx-pod label. The default ClusterIP type makes the service reachable only from inside the cluster.
# nginx-service.yaml
apiVersion: v1
kind: Service
metadata:
  name: nginx-service
spec:
  selector:
    app: nginx-pod
  ports:
    - protocol: TCP
      port: 80
      targetPort: 80
kubectl apply -f nginx-service.yaml
# service/nginx-service created
kubectl get serviceOutput:
NAME            TYPE        CLUSTER-IP     EXTERNAL-IP   PORT(S)   AGE
kubernetes      ClusterIP   10.100.0.1     <none>        443/TCP   56m
nginx-service   ClusterIP   10.100.15.31   <none>        80/TCP    64s
The EXTERNAL-IP is <none> at this point, that is expected for a ClusterIP Service, since it is only accessible internally.
Troubleshooting: Port-Forward Timeout Due to Missing Labels
I attempted to forward local port 8089 to the service to test it in a browser:
kubectl port-forward svc/nginx-service 8089:80
❌ error: timed out waiting for the condition
Root cause: The Service uses a selector (app: nginx-pod) to find Pods to route traffic to. The original Pod manifest did not include that label, so the Service could not find any backing Pod and the forward timed out.
✅ Fix: I deleted the existing Pod, added the matching label to the Pod manifest (labels: app: nginx-pod), and reapplied it. Once the label was present the Service selector matched and port-forwarding worked immediately.
apiVersion: v1
kind: Pod
metadata:
  name: nginx-pod
  labels:
    app: nginx-pod
spec:
  containers:
  - image: nginx:latest
    name: nginx-pod
    ports:
    - containerPort: 80
      protocol: TCP
kubectl delete pod nginx-pod
# After updating nginx-pod.yaml with the label:
kubectl apply -f nginx-pod.yaml
# pod/nginx-pod created
kubectl port-forward svc/nginx-service 8089:80Output:
Forwarding from 127.0.0.1:8089 -> 80
Forwarding from [::1]:8089 -> 80
Handling connection for 8089
Handling connection for 8089
Accessing 127.0.0.1:8089 in a text browser confirms the Nginx welcome page loads successfully.

Working with ReplicaSets
Basic ReplicaSet
A ReplicaSet guarantees that a specified number of identical Pod replicas are running at all times. If a Pod is deleted, the ReplicaSet automatically creates a replacement. I define one with 3 replicas:
# rs.yaml
apiVersion: apps/v1
kind: ReplicaSet
metadata:
  name: nginx-rs
spec:
  replicas: 3
  selector:
    matchLabels:
      app: nginx-pod
  template:
    metadata:
      name: nginx-pod
      labels:
        app: nginx-pod
    spec:
      containers:
      - image: nginx:latest
        name: nginx-pod
        ports:
        - containerPort: 80
          protocol: TCP
kubectl apply -f rs.yaml
# replicaset.apps/nginx-rs created
kubectl get podsOutput:
NAME             READY   STATUS    RESTARTS   AGE
nginx-pod        1/1     Running   0          49m
nginx-rs-6qshv   1/1     Running   0          17m
nginx-rs-ch9tp   1/1     Running   0          17m
To test self-healing, I delete one of the ReplicaSet Pods:
kubectl delete pod nginx-rs-ch9tp
# pod "nginx-rs-ch9tp" deleted

kubectl get pods
Output:
NAME             READY   STATUS    RESTARTS   AGE
nginx-pod        1/1     Running   0          50m
nginx-rs-6qshv   1/1     Running   0          18m
nginx-rs-tqvs8   1/1     Running   0          21s   ← new replacement pod
The ReplicaSet immediately created nginx-rs-tqvs8 to replace the deleted Pod and bring the count back to 3. Running kubectl get rs -o wide confirms the desired/current/ready state:
NAME       DESIRED   CURRENT   READY   AGE   SELECTOR
nginx-rs   3         3         3       19m   app=nginx-pod
I can also scale the ReplicaSet imperatively without editing the manifest:
kubectl scale rs nginx-rs --replicas=5

kubectl get pods
Output:
NAME             READY   STATUS    RESTARTS   AGE
nginx-pod        1/1     Running   0          54m
nginx-rs-6qshv   1/1     Running   0          23m
nginx-rs-gzn6q   1/1     Running   0          26s
nginx-rs-hkpfm   1/1     Running   0          26s
nginx-rs-tqvs8   1/1     Running   0          5m6s
Advanced Label Selection with matchExpressions
The first ReplicaSet used a simple matchLabels selector. A second manifest (rs2.yaml) demonstrates more expressive selection using matchExpressions, which supports operators like In, NotIn, and Exists:
# rs2.yaml
spec:
  replicas: 3
  selector:
    matchLabels:
      env: prod
    matchExpressions:
    - { key: tier, operator: In, values: [frontend] }
  template:
    metadata:
      labels:
        env: prod
        tier: frontend
kubectl apply -f rs2.yaml
# replicaset.apps/nginx-rs created
kubectl get rs nginx-rs -o wideOutput:
NAME       DESIRED   CURRENT   READY   AGE   SELECTOR
nginx-rs   3         3         3       15s   env=prod,tier in (frontend)
The SELECTOR column confirms that both criteria, env=prod and tier in (frontend), must be satisfied for a Pod to be managed by this ReplicaSet.
Exposing the Service via AWS Load Balancer
Using ClusterIP or port-forwarding is fine for internal testing, but for real external access on AWS we switch the Service type to LoadBalancer. Kubernetes automatically provisions an AWS Elastic Load Balancer and routes public traffic to the Pods.
# nginx-service.yaml (updated)
apiVersion: v1
kind: Service
metadata:
  name: nginx-service
spec:
  type: LoadBalancer
  selector:
    tier: frontend
  ports:
    - protocol: TCP
      port: 80
      targetPort: 80
kubectl apply -f nginx-service.yaml
# service/nginx-service configured
kubectl get service nginx-serviceOutput:
NAME TYPE CLUSTER-IP EXTERNAL-IP PORT(S) AGE
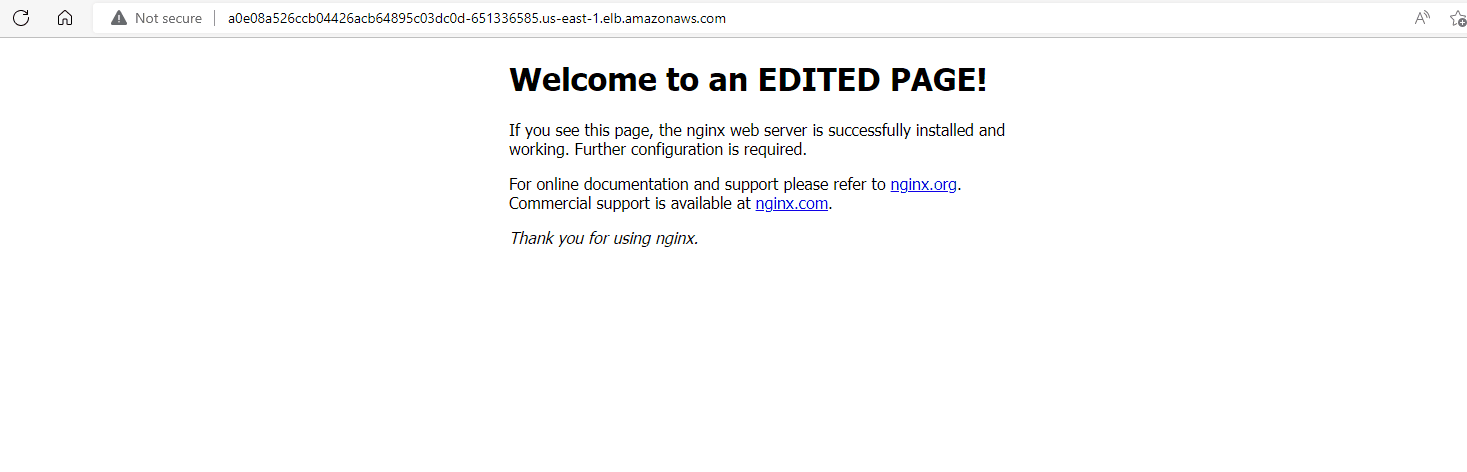
nginx-service LoadBalancer 10.100.15.31 a0e08a526ccb04426acb64895c03dc0d-651336585.us-east-1.elb.amazonaws.com 80:30466/TCP 95m
Two things to notice in this output:
- EXTERNAL-IP is now an AWS ELB DNS hostname, this is the public address to hit from a browser.
- PORT(S) shows
80:30466/TCP, meaning port 80 on the load balancer maps to NodePort 30466 on the worker nodes. The NodePort range (30000–32767) must be open in the EC2 Security Group inbound rules.
Even though the Service type is LoadBalancer, Kubernetes still assigns a clusterIP internally to route traffic from the load balancer through the cluster. The ELB is the public entry point; the clusterIP handles internal forwarding.
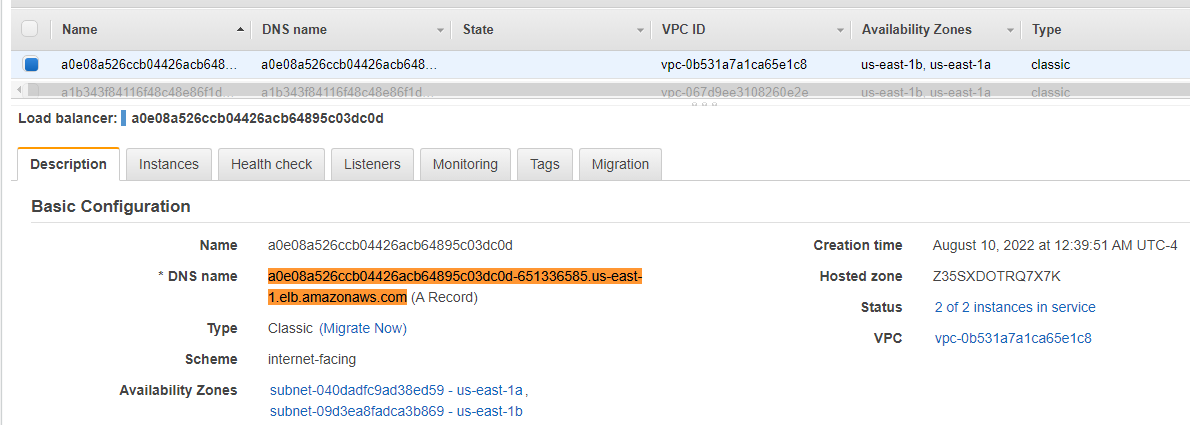
Using the DNS name of the load balancer a0e08a526ccb04426acb64895c03dc0d-651336585.us-east-1.elb.amazonaws.com, I tested the service by accessing it in a web browser.

Using Deployment Controllers
While ReplicaSets work, the recommended approach is to use a Deployment, which wraps and manages a ReplicaSet and adds powerful capabilities on top: rolling updates, rollback history, and declarative state management.
Creating a Deployment
# deployment.yaml
apiVersion: apps/v1
kind: Deployment
metadata:
  name: nginx-deployment
  labels:
    tier: frontend
spec:
  replicas: 3
  selector:
    matchLabels:
      tier: frontend
  template:
    metadata:
      labels:
        tier: frontend
    spec:
      containers:
      - name: nginx
        image: nginx:latest
        ports:
        - containerPort: 80
kubectl apply -f deployment.yaml
# deployment.apps/nginx-deployment created
kubectl get deploymentOutput:
NAME               READY   UP-TO-DATE   AVAILABLE   AGE
nginx-deployment   3/3     3            3           20s
The Deployment automatically created a ReplicaSet to manage the Pods:
kubectl get rsOutput:
NAME                          DESIRED   CURRENT   READY   AGE
nginx-deployment-5cb44ffccf   3         3         3       32s
Declarative Control: Deployment Overrides Manual ReplicaSet Scaling
This experiment demonstrates a key principle of Kubernetes Deployments, the desired state always wins. I manually scale the underlying ReplicaSet to 15 replicas to see what happens:
kubectl scale rs nginx-deployment-5cb44ffccf --replicas=15
# replicaset.apps/nginx-deployment-5cb44ffccf scaled

kubectl get pods
Output (immediately after):
NAME                                READY   STATUS        RESTARTS   AGE
nginx-deployment-5cb44ffccf-4m86n   1/1     Running       0          2m16s
nginx-deployment-5cb44ffccf-87bqs   1/1     Terminating   0          6s
nginx-deployment-5cb44ffccf-8rrkf   1/1     Running       0          2m16s
nginx-deployment-5cb44ffccf-lsgcc   1/1     Terminating   0          6s
...
The Deployment controller detected that the ReplicaSet no longer matched the desired state of 3 replicas and immediately began terminating the extra Pods. A moment later:
kubectl get podsOutput:
NAME                                READY   STATUS    RESTARTS   AGE
nginx-deployment-5cb44ffccf-4m86n   1/1     Running   0          2m41s
nginx-deployment-5cb44ffccf-8rrkf   1/1     Running   0          2m41s
nginx-deployment-5cb44ffccf-p8w6q   1/1     Running   0          2m41s
Back to exactly 3. This illustrates the declarative nature of Deployments, the spec is the source of truth, and the controller continuously reconciles the live state to match it. Any manual change to the ReplicaSet is treated as drift and corrected automatically.
Exec into a Pod Container
Sometimes you need to inspect what is happening inside a running container. kubectl exec opens an interactive shell:
kubectl exec -it nginx-deployment-5cb44ffccf-4m86n bashFrom inside the container I can inspect the Nginx configuration:
ls -ltr /etc/nginx/Output:
total 24
-rw-r--r-- 1 root root  664 Jul 19 14:05 uwsgi_params
-rw-r--r-- 1 root root  636 Jul 19 14:05 scgi_params
-rw-r--r-- 1 root root 5349 Jul 19 14:05 mime.types
-rw-r--r-- 1 root root 1007 Jul 19 14:05 fastcgi_params
-rw-r--r-- 1 root root  648 Jul 19 15:06 nginx.conf
drwxr-xr-x 1 root root   26 Aug 10 04:53 conf.d
cat /etc/nginx/conf.d/default.confOutput (excerpt):
server {
    listen       80;
    server_name  localhost;

    location / {
        root   /usr/share/nginx/html;
        index  index.html index.htm;
    }
}
Note: The
kubectl exec [POD] [COMMAND]syntax is deprecated. The current recommended form iskubectl exec [POD] -- [COMMAND].
Persisting Data for Pods
Pods in Kubernetes are ephemeral, when a Pod is deleted, any data written inside its container is permanently lost. To demonstrate this, I scale the deployment down to a single replica, exec in, and edit the Nginx index.html to display a custom message.
kubectl autoscale deployment nginx-deployment --max=1 --min=1

kubectl get pods
Output:
NAME                                READY   STATUS    RESTARTS   AGE
nginx-deployment-5cb44ffccf-ws8b5   1/1     Running   0          9m9s
Inside the Pod I install vim, edit /usr/share/nginx/html/index.html, and change the <h1> to read “Welcome to an EDITED PAGE!”. The browser confirms the change:
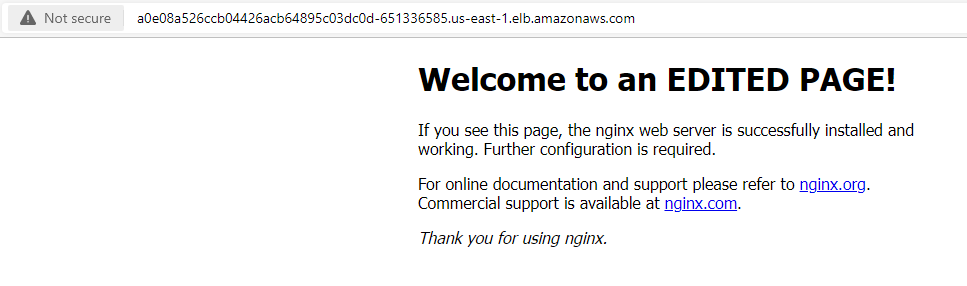
When the Pod is deleted, Kubernetes creates a fresh replacement from the original image, and the edit is gone.
This behavior is by design. Pods are intentionally stateless to support scalability and fault tolerance. Persisting data across Pod restarts requires a dedicated storage solution such as PersistentVolumes and PersistentVolumeClaims, which are covered in the follow-up project.
Summary
| Concept | What I Practiced |
|---|---|
| EKS Cluster Setup | VPC stack, IAM role, cluster creation, kubeconfig |
| Pod | Defined and deployed an Nginx Pod via YAML manifest |
| Service (ClusterIP) | Exposed the Pod internally; used port-forwarding |
| Service (LoadBalancer) | Provisioned an AWS ELB for external access |
| ReplicaSet | Ensured desired replica count; tested self-healing and scaling |
| Deployment | Managed ReplicaSets declaratively; observed reconciliation loop |
| kubectl exec | Inspected and modified a running container |
| Ephemeral Storage | Demonstrated data loss on Pod deletion |