(old Project 15)
Provisioning with Terraform
Note
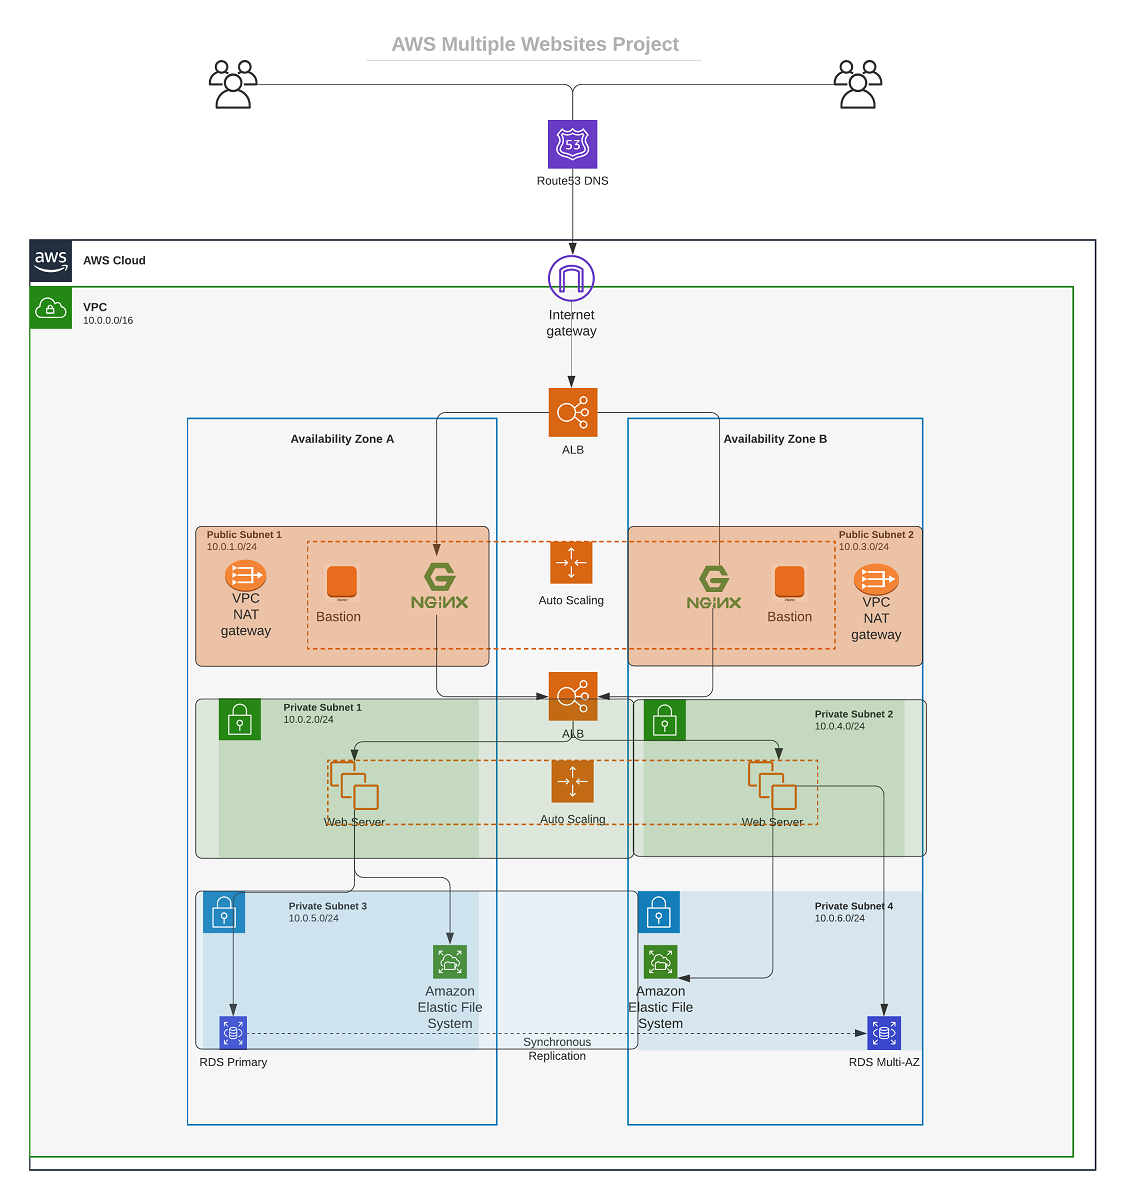
PROJECT 15 In this project we will build a secure infrastructure inside AWS VPC (Virtual Private Cloud) network for a fictitious company that uses WordPress CMS for its main business website, and a Tooling Website for their DevOps team. As part of the desire for improved security and performance we’ll use a reverse proxy technology from NGINX to achieve this.
Cost, Security, and Scalability are the major requirements for this project. Hence, implementing the architecture designed below, ensure that infrastructure for both websites, WordPress and Tooling, is resilient to Web Server’s failures, can accommodate to increased traffic and, at the same time, has reasonable cost.
Project 15: Steps
1. AWS Organizations and Account Setup
Created an Organizational Unit (OU) called Dev. AWS Organizations > AWS accounts Select root account > Actions > Organizational Unit - Create New
Created a new account called DevOps
AWS Organizations > AWS accounts > Add an AWS Account
Moved DevOps account to Organizational Unit Dev
Select DevOps > Actions > Move
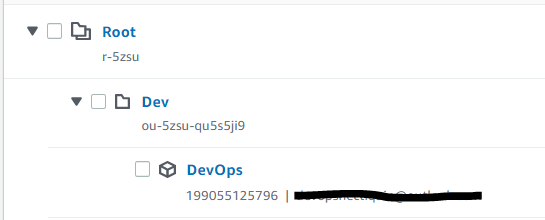
Logged into the DevOps account to set up the infrastructure.

2. VPC and Networking
VPC Creation:
Created a VPC named HRA-VPC with CIDR 10.0.0.0/16 and enabled DNS hostnames.
VPC > Your VPCs > Create VPC
Internet Gateway:
Created HRA-Igw and attached it to HRA-VPC. VPC > Internet Gateways > Create internet gateway
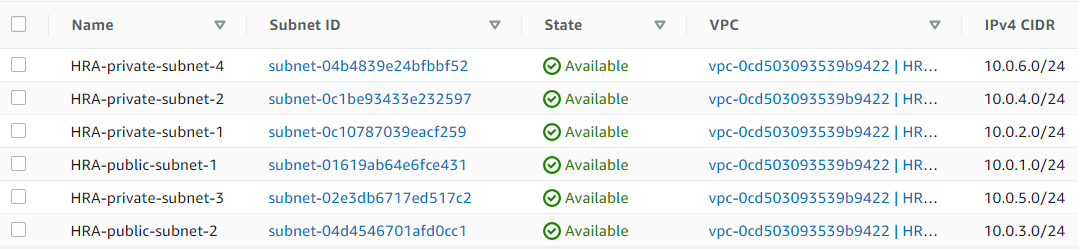
Subnets:
VCP > Subnets > Create subnet
Public Subnets:
- HRA-public-subnet-1:
10.0.1.0/24(us-east-1a) - HRA-public-subnet-2:
10.0.3.0/24(us-east-1b)
Private Subnets:
- HRA-private-subnet-1:
10.0.2.0/24(us-east-1a) - HRA-private-subnet-2:
10.0.4.0/24(us-east-1b) - HRA-private-subnet-3:
10.0.5.0/24(us-east-1a) - HRA-private-subnet-4:
10.0.6.0/24(us-east-1b)
Route Tables:
refactoring#pending routing to a NAT
VPC > Route Tables > Create route table
- Created HRA-public-rtb (associated with public subnets, routing to HRA-Igw).
- Created HRA-private-rtb (associated with private subnets, routing to a NAT gateway).

Associate Subnets to Route Tables
-
HRA-public-rtb to Public Subnets
Expand to see GIF
-
HRA-private-rtb to Private Subnets
Expand to see GIF
Edit Public Route Table HRA-public-rtb (to target HRA-Igw Internet Gateway)
Expand to see GIF
NAT Gateway
Allocated an Elastic IP (HRA-NAT) and created a NAT gateway (HRA-NatGateway) in HRA-public-subnet-1. (NAT uses the Elastic IP)
VPC > Elastic IPs > Allocate Elastic IP Address
Expand to see GIF
VPC > NAT Gateways > Create NAT gateway
Expand to see GIF
Configured HRA-private-rtb to route dest: 0.0.0.0/0 to target: HRA-NatGateway for outbound internet access from private subnets.
Expand to see GIF
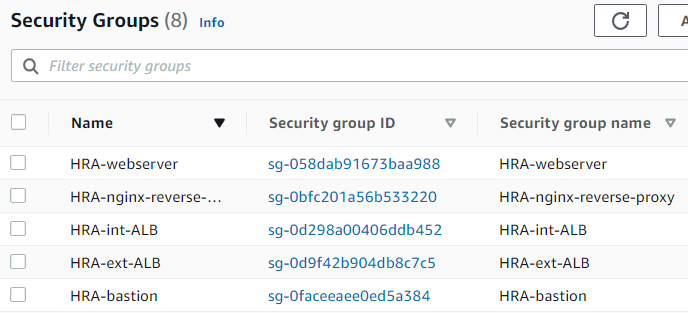
3. Security Groups
VPC > SECURITY > Security Groups > Create security group
Configured security groups to control traffic:
- HRA-ext-ALB: Allows HTTP/HTTPS from anywhere.
- HRA-bastion: Allows SSH from anywhere (ideally restricted to your IP).
- HRA-nginx-reverse-proxy: Allows HTTP/HTTPS from HRA-ext-ALB.
- HRA-int-ALB: Allows HTTP/HTTPS from HRA-nginx-reverse-proxy.
- HRA-webserver: Allows SSH from HRA-bastion, HTTP/HTTPS from HRA-int-ALB.
- HRA-datalayer: Allows MySQL/Aurora from HRA-bastion and HRA-webserver, NFS from HRA-webserver.
4. DNS and Certificates
Refactoring#pending
I start by getting a domain hracompany.ga from www.freenom.com
test
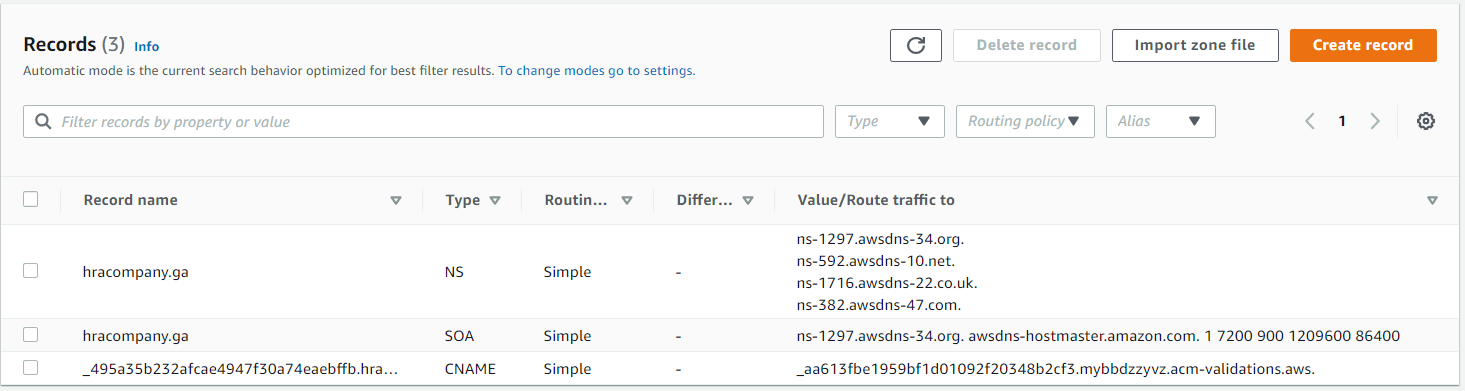
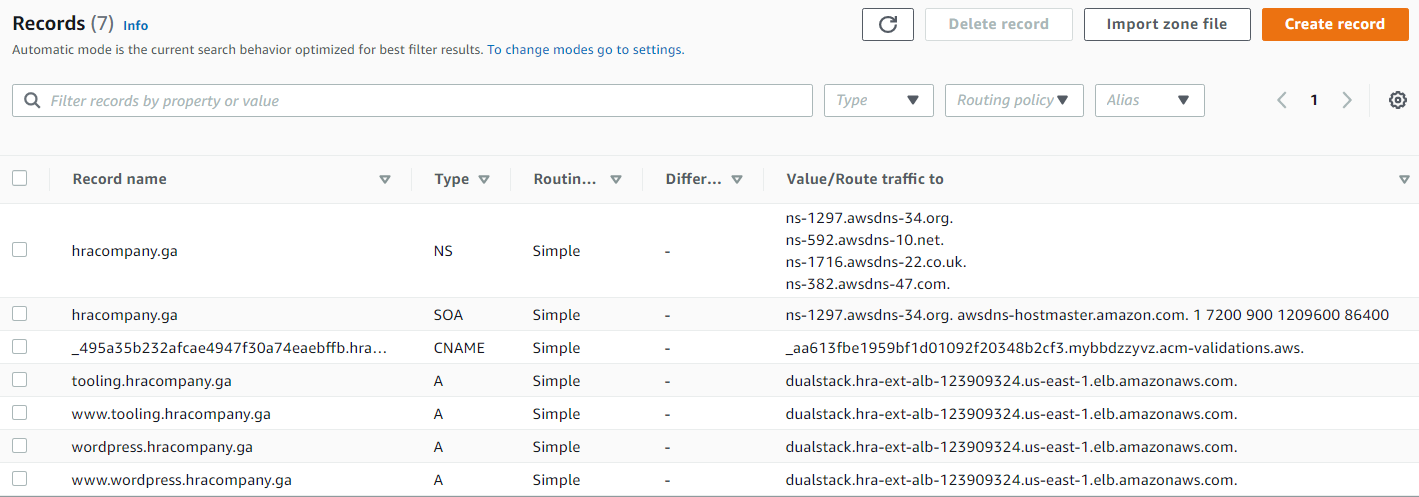
Tells Route 53 how to respond to DNS queries for domain hracompany.ga
Route 53 > Hosted zones > Create hosted zone
Expand to see GIF
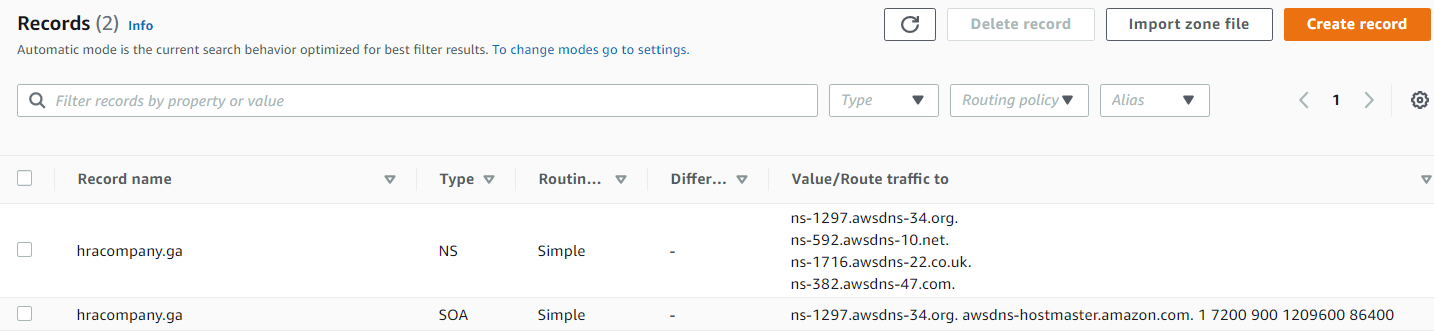
The values under Value/Route traffic to are nameservers, need to add those in www.freenom.com
Request Certificate
DNS Validation
Tag: Name HRA-Cert
Validation Step: button Create record in Route 53

Now we see in Route 53 > Hosted zones > hracompany.ga
Creating Elastic File System
EFS > Create file system
Name: HRA-filesystem
VPC: HRA-VPC
Mount targets: HRA-private-subnet-1 and HRA-private-subnet-2, where the webservers are, resources in these subnets will have the ability to mount the filesystem
Apply Security Group HRA-datalayer
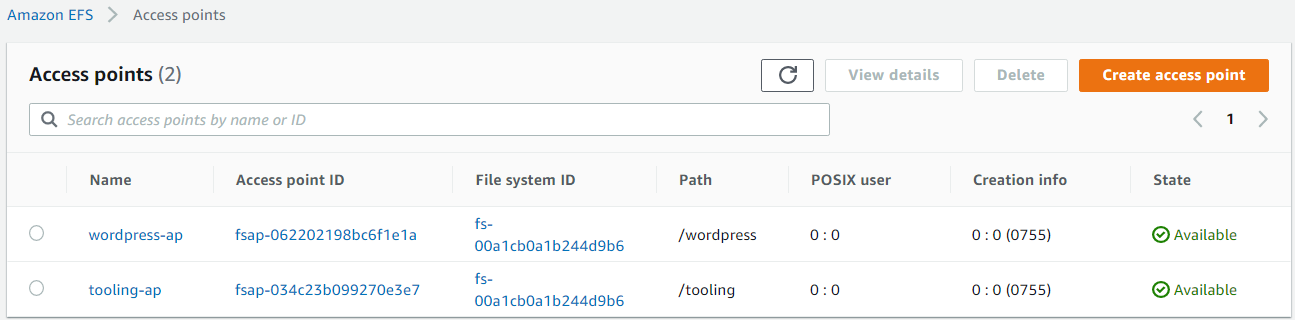
Creating Access Point
Working with Amazon EFS access points
Amazon EFS access points are application-specific entry points into an EFS file system that make it easier to manage application access to shared datasets.
- Details:
- Name: wordpress
- Root directory path:
/wordpress
- Root directory path:
- POSIX user:
- User ID:
0 - Group ID:
0
- User ID:
- Root directory creation permission:
- Owner user ID:
0 - Owner group ID:
0 - POSIX permission to apply to the root directory path :
0755 - Tag name: wordpress-ap (ap access point)
- Owner user ID:
- Name: wordpress
- Details:
- Name: tooling
- Root directory path:
/tooling
- Root directory path:
- POSIX user:
- User ID:
0 - Group ID:
0
- User ID:
- Root directory creation permission:
- Owner user ID:
0 - Owner group ID:
0 - POSIX permission to apply to the root directory path :
0755 - Tag name: tooling-ap (ap access point)
- Owner user ID:
- Name: tooling
Create RDS
- Create KMS Key
KMS > Customer managed keys > Create Key- Step1: (defaults)
- Key type: Symmetric
- Advanced options
- Key material origin: KMS
- Regionality: Single-Region key
- Step2:
- Alias: HRA-rds
- Description: for the rds instance
- Tags: Name HRA-rds-key
- Step3:
- Add yourself as administrator of key (created AIM user Hector)
- Step1: (defaults)

Create Subnet Group
Amazon RDS > Subnet groups > Create DB Subnet Group
- Subnet group details
- Name: hra-rds-subnet
- Description: for rds subnets
- VPC: HRA-VPC
- Add subnets
- Availability Zones: us-east-1a, us-east-1b
- Subnets: Private 3 and 4
- Name: hra-rds-subnet

Create RDS
- Amazon RDS > Dashboard > Create database
Choose a database creation method: Standard create
Engine options: MySQL
Templates: Free tier (wont able to select KMS key to encrypt DB), select production, you can see it by just scrolling down
Settings- DB cluster identifier: HRA-database
- Credentials Settings
- Master username: HRAadmin
- Master password: admin12345
- Connectivity
- Virtual private cloud (VPC): HRA-VPC
- Subnet group: hra-rds-subnet
- Existing VPC security groups: HRA-datalayer
Availability Zone: us-east-1a Database options:- Initial database name: test (no need to have it)
Production gives option to select encryption key
Creating RDS with Free Tier
Get the Endpoint:
hra-database.cssi6ineszpw.us-east-1.rds.amazonaws.com
Creating and Preparing EC2 Instances
We create 3 RedHat Instances bastion, nginx and webserver install the needed software to create an images from them later
Bastion
	#commands for ami installation
	sudo yum install -y https://dl.fedoraproject.org/pub/epel/epel-release-latest-8.noarch.rpm
	sudo yum install -y dnf-utils http://rpms.remirepo.net/enterprise/remi-release-8.rpm
	sudo yum install wget vim python3 telnet htop git mysql net-tools chrony -y
	sudo systemctl start chronyd
	sudo systemctl enable chronyd
Nginx
#commands for ami installation
yum install -y https://dl.fedoraproject.org/pub/epel/epel-release-latest-8.noarch.rpm
yum install -y dnf-utils http://rpms.remirepo.net/enterprise/remi-release-8.rpm
yum install wget vim python3 telnet htop git mysql net-tools chrony -y
systemctl start chronyd
systemctl enable chronyd


#configure selinux policies
setsebool -P httpd_can_network_connect=1
setsebool -P httpd_can_network_connect_db=1
setsebool -P httpd_execmem=1
setsebool -P httpd_use_nfs 1


#install amazon efs utils for mounting the target on the Elastic file system
git clone https://github.com/aws/efs-utils
cd efs-utils
yum install -y make
yum install -y rpm-build
make rpm
yum install -y  ./build/amazon-efs-utils*rpm

#setting up self-signed certificate
sudo mkdir /etc/ssl/private
sudo chmod 700 /etc/ssl/private
openssl req -x509 -nodes -days 365 -newkey rsa:2048 -keyout /etc/ssl/private/ACS.key -out /etc/ssl/certs/ACS.crt
sudo openssl dhparam -out /etc/ssl/certs/dhparam.pem 2048
Self Signed Certificates
- Nginx Self Signed Certificate Output
writing new private key to '/etc/ssl/private/ACS.key'
-----
You are about to be asked to enter information that will be incorporated
into your certificate request.
What you are about to enter is what is called a Distinguished Name or a DN.
There are quite a few fields but you can leave some blank
For some fields there will be a default value,
If you enter '.', the field will be left blank.
-----
Country Name (2 letter code) [XX]:US
State or Province Name (full name) []:FL
Locality Name (eg, city) [Default City]:Miami
Organization Name (eg, company) [Default Company Ltd]:HRAcompany
Organizational Unit Name (eg, section) []:Dev
Common Name (eg, your name or your server's hostname) []:172.31.17.2
Email Address []:myemail@email.com
Webserver
	#commands for ami installation
	yum install -y https://dl.fedoraproject.org/pub/epel/epel-release-latest-8.noarch.rpm
	yum install -y dnf-utils http://rpms.remirepo.net/enterprise/remi-release-8.rpm
	yum install wget vim python3 telnet htop git mysql net-tools chrony -y
	systemctl start chronyd
	systemctl enable chronyd

	#configure selinux policies
	setsebool -P httpd_can_network_connect=1
	setsebool -P httpd_can_network_connect_db=1
	setsebool -P httpd_execmem=1
	setsebool -P httpd_use_nfs 1

	#install amazon efs utils for mounting the target on the Elastic file system
	git clone https://github.com/aws/efs-utils
	cd efs-utils
	yum install -y make
	yum install -y rpm-build
	make rpm
	yum install -y  ./build/amazon-efs-utils*rpm

	#setting up self signed certificate for the webserver (apache)
	yum install -y mod_ssl
	openssl req -newkey rsa:2048 -nodes -keyout /etc/pki/tls/private/ACS.key -x509 -days 365 -out /etc/pki/tls/certs/ACS.crt
vi /etc/httpd/conf.d/ssl.conf- Apache Self Signed Certificate Output
Same as Nginx except hostname
Common Name (eg, your name or your server's hostname) []:172.31.24.114`
Need to change vi /etc/httpd/conf.d/ssl.conf
We need to change:
SSLCertificateFile /etc/pki/tls/certs/localhost.crt to SSLCertificateFile /etc/pki/tls/certs/ACS.crt
SSLCertificateKeyFile /etc/pki/tls/private/localhost.key to SSLCertificateKeyFile /etc/pki/tls/private/ACS.key
I used sed
sed -i 's_SSLCertificateFile /etc/pki/tls/certs/localhost.crt_SSLCertificateFile /etc/pki/tls/certs/ACS.crt_g' /etc/httpd/conf.d/ssl.confsed -i 's_SSLCertificateKeyFile /etc/pki/tls/private/localhost.key_SSLCertificateKeyFile /etc/pki/tls/private/ACS.key_g' /etc/httpd/conf.d/ssl.confCreating AMI from the instances
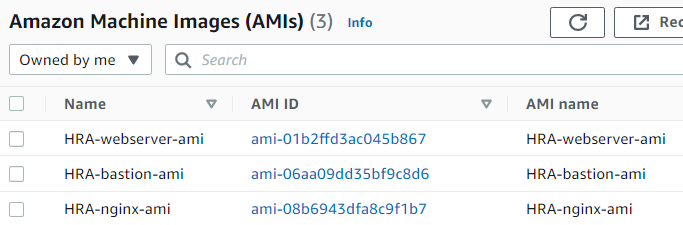
(deleted instances after)
HRA-webserver-ami , description: for webserver HRA-bastion-ami , description: for bastion HRA-nginx-ami , description: for nginx
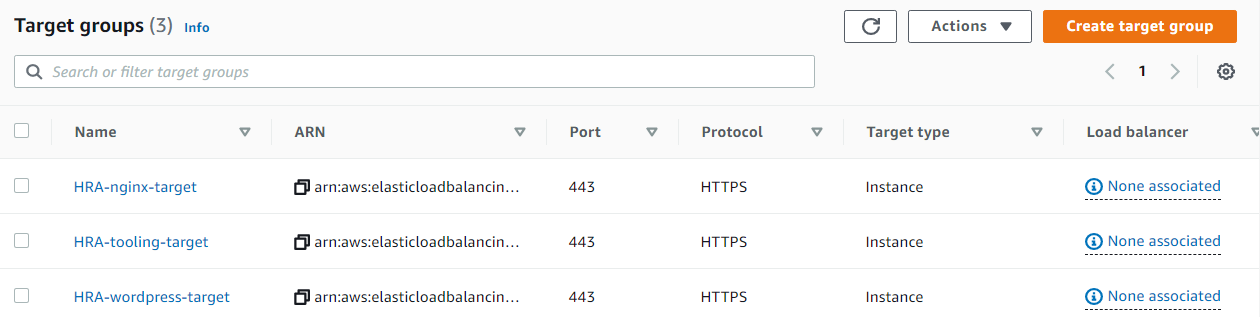
Creating Target Groups
EC2 > Load Balancing >Target Groups > Create target group
-
Target group name: HRA-nginx-target
Protocol: HTTPS
VPC: HRA-VPC
Health check settings- Protocol: HTTPS
Path:/healthstatus
- Protocol: HTTPS
-
Target group name: HRA-wordpress-target
Protocol: HTTPS
VPC: HRA-VPC
Health check settings- Protocol: HTTPS
Path:/healthstatus
- Protocol: HTTPS
-
Target group name: HRA-tooling-target
Protocol: HTTPS
VPC: HRA-VPC Health check settings- Protocol: HTTPS
Path:/healthstatus
- Protocol: HTTPS
Creating Load Balancers
EC2 > Load Balancers > Create Load Balancer
Select load balancer type: Application Load Balancer
- Step 1
- Basic Configuration
- Name: HRA-ext-ALB
Scheme: internet-facing
- Name: HRA-ext-ALB
- Listeners
- Load Balancer Protocol: HTTPS
- Availability Zones
- VPC: HRA-VPC
Availability Zones:- us-east-1a HRA-public-subnet-1
us-east-1b HRA-public-subnet-2
- us-east-1a HRA-public-subnet-1
- VPC: HRA-VPC
- Tags:
- Name HRA-ext-ALB
- Basic Configuration
- Step 2
- Select default certificate
- Certificate type: Choose a certificate from ACM (recommended)
- Certificate name: HRA-Cert
- Select default certificate
- Step 3
- Assign a security group: Select an existing security group HRA-ext-ALB
- Step 4
- Target group: Existing target group
Name: HRA-nginx-target
Health checks- Path:
/healthstatus
- Path:
- Target group: Existing target group
On Listeners and routing added HTTPS:443
- Step 1
- Basic Configuration
- Name: HRA-int-ALB
- Scheme: Internal-facing
- Listeners
- Load Balancer Protocol: HTTPS
- Availability Zones
- VPC: HRA-VPC
Availability Zones:- us-east-1a HRA-private-subnet-1
us-east-1b HRA-private-subnet-2
- us-east-1a HRA-private-subnet-1
- VPC: HRA-VPC
- Tags:
- Name HRA-int-ALB
- Basic Configuration
- Step 2
- Select default certificate
- Certificate type: Choose a certificate from ACM (recommended)
- Certificate name: HRA-Cert
- Select default certificate
- Step 3
- Assign a security group: Select an existing security group HRA-int-ALB
- Step 4
- Target group: Existing target group
Name: HRA-wordpress-target
Health checks- Path:
/healthstatus
- Path:
- Target group: Existing target group
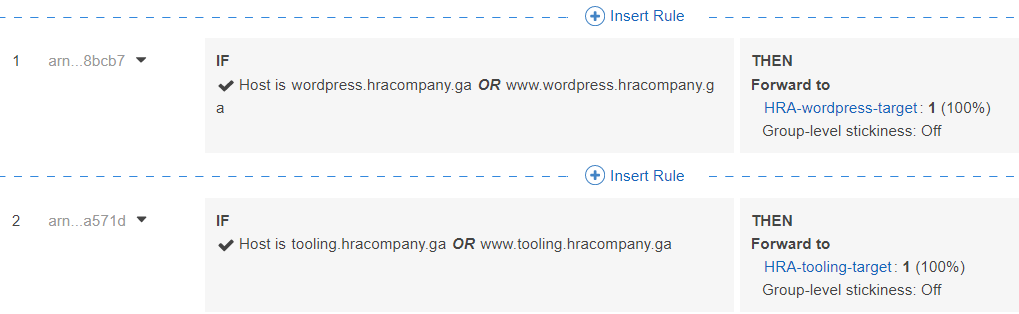
Go to internal LB and click tab Listeners
We can insert rule, add condition, host header
So depending on the header tooling.hracompany.ga, www.tooling.hracompany.ga, wordpress.hracompany.ga, www.wordpress.hracompany.ga, traffic will be forwarded to a specific target group
Creating Launch Templates
EC2 > Launch Templates > Create launch template
-
Launch template name and description
- Launch template name: HRA-bastion-template Template version description: for bastion
-
Template tags
- Name HRA-bastion-template
-
Application and OS Images (Amazon Machine Image)
- AMI: HRA-bastion-ami
-
Instance type
- Instance type: t2.micro
-
Key pair (login)
- Key pair name: devops.pem
-
Network settings
- Subnet: HRA-public-subnet-2
Firewall (security groups) - Select existing security group
- Security groups: HRA-bastion
- Advanced network configuration
- Network Interface: Auto-assign public IP: Enable Subnet Security groups, putting it twice? they are pick automatically
- Subnet: HRA-public-subnet-2
Firewall (security groups) - Select existing security group
-
Advanced details
- User data:
#!/bin/bash
yum update
yum install -y mysql
yum install -y git tmux
yum install -y ansible
- User data:
-
Launch template name and description
- Launch template name: HRA-nginx-template Template version description: for nginx
-
Template tags
- Name HRA-nginx-template
-
Application and OS Images (Amazon Machine Image)
- AMI: HRA-nginx-ami
-
Instance type
- Instance type: t2.micro
-
Key pair (login)
- Key pair name: devops.pem
-
Network settings
- Subnet: HRA-public-subnet-1
Firewall (security groups) - Select existing security group
- Security groups: HRA-nginx-reverse-proxy
- Advanced network configuration
- Auto-assign public IP: Enable
- Subnet: HRA-public-subnet-1
Firewall (security groups) - Select existing security group
-
Advanced details
- User data: (more explanation)
#!/bin/bash
yum install -y nginx
systemctl start nginx
systemctl enable nginx
git clone https://github.com/hectorproko/HRA-project-config.git
mv /HRA-project-config/reverse.conf /etc/nginx/
mv /etc/nginx/nginx.conf /etc/nginx/nginx.conf-distro
cd /etc/nginx/
touch nginx.conf
sed -n 'w nginx.conf' reverse.conf
systemctl restart nginx
rm -rf reverse.conf
rm -rf /HRA-project-config
- User data: (more explanation)
Need to edit reverse.conf in repo https://github.com/hectorproko/HRA-project-config.git
Make sure I have:
server_name *.hracompany.ga;
proxy pass https://internal-HRA-int-ALB-1557292755.us-east-1.elb.amazonaws.com/; (Internal Load Balancer)
- Launch template name and description
- Launch template name: HRA-wordpress-template Template version description: for wordpress
- Template tags
- Name HRA-wordpress-template
- Application and OS Images (Amazon Machine Image)
- AMI: HRA-webserver-ami
- Instance type
- Instance type: t2.micro
- Key pair (login)
- Key pair name: devops.pem
- Network settings
- Subnet: HRA-private-subnet-1
Firewall (security groups) - Select existing security group
- Security groups: HRA-webservers
- Advanced network configuration
- Auto-assign public IP: disable
- Subnet: HRA-private-subnet-1
Firewall (security groups) - Select existing security group
- Advanced details
- User data:
#!/bin/bash
mkdir /var/www/
sudo mount -t efs -o tls,accesspoint=`fsap-062202198bc6f1e1a fs-00a1cb0a1b244d9b6`:/ /var/www/
yum install -y httpd
systemctl start httpd
systemctl enable httpd
yum module reset php -y
yum module enable php:remi-7.4 -y
yum install -y php php-common php-mbstring php-opcache php-intl php-xml php-gd php-curl php-mysqlnd php-fpm php-json
systemctl start php-fpm
systemctl enable php-fpm
wget http://wordpress.org/latest.tar.gz
tar xzvf latest.tar.gz
rm -rf latest.tar.gz
cp wordpress/wp-config-sample.php wordpress/wp-config.php
mkdir /var/www/html/
cp -R /wordpress/* /var/www/html/
cd /var/www/html/
touch healthstatus
sed -i "s/localhost/`hra-database.cssi6ineszpw.us-east-1.rds.amazonaws.com`/g"
wp-config.php
sed -i "s/username_here/HRAadmin/g" wp-config.php
sed -i "s/password_here/admin12345/g" wp-config.php
sed -i "s/database_name_here/wordpressdb/g" wp-config.php #doesnt exist yet
chcon -t httpd_sys_rw_content_t /var/www/html/ -R
systemctl restart httpd
Need to change EFS Access Point
Amazon EFS > Access points (I get access point for wordpress)
sudo mount -t efs -o tls,accesspoint=fsap-062202198bc6f1e1a fs-00a1cb0a1b244d9b6:/ /var/www/
In access point you need click attach to get the mount point of EFS
Need to change RDS Endpoint
- RDS > Databases > <Your Database>
- Connectivity & security
- Endpoint: <Need this>
- Connectivity & security
sed -i “s/localhost/hra-database.cssi6ineszpw.us-east-1.rds.amazonaws.com/g”
Master username: HRAadmin
Master password: admin12345
- Launch template name and description
- Launch template name: HRA-tooling-template Template version description: for tooling
- Template tags
- Name HRA-tooling-template
- Application and OS Images (Amazon Machine Image)
- AMI: HRA-webserver-ami
- Instance type
- Instance type: t2.micro
- Key pair (login)
- Key pair name: devops.pem
- Network settings
- Subnet: HRA-private-subnet-1
Firewall (security groups) - Select existing security group
- Security groups: HRA-webservers
- Advanced network configuration
- Auto-assign public IP: disable
- Subnet: HRA-private-subnet-1
Firewall (security groups) - Select existing security group
- Advanced details
- User data:
#!/bin/bash
mkdir /var/www/
sudo mount -t efs -o tls,accesspoint=fsap-034c23b099270e3e7 fs-00a1cb0a1b244d9b6:/ /var/www/
yum install -y httpd
systemctl start httpd
systemctl enable httpd
yum module reset php -y
yum module enable php:remi-7.4 -y
yum install -y php php-common php-mbstring php-opcache php-intl php-xml php-gd php-curl php-mysqlnd php-fpm php-json
systemctl start php-fpm
systemctl enable php-fpm
git clone https://github.com/hectorproko/tooling.git
mkdir /var/www/html
cp -R /tooling/html/*  /var/www/html/
cd /tooling
mysql -h hra-database.cssi6ineszpw.us-east-1.rds.amazonaws.com -u HRAadmin -p toolingdb < tooling-db.sql
cd /var/www/html/
touch healthstatus
sed -i "s/$db = mysqli_connect('mysql.tooling.svc.cluster.local', 'admin', 'admin', 'tooling');/$db = mysqli_connect('hra-database.cssi6ineszpw.us-east-1.rds.amazonaws.com', 'HRAadmin', 'admin12345', 'toolingdb');/g" functions.php
chcon -t httpd_sys_rw_content_t /var/www/html/ -R
systemctl restart httpd
- User data:
Need to change EFS Access Point
Amazon EFS > Access points (I get access point for tooling)
sudo mount -t efs -o tls,accesspoint=fsap-034c23b099270e3e7 fs-00a1cb0a1b244d9b6:/ /var/www/
Need to change RDS Endpoint
- RDS > Databases > <Your Database>
- Connectivity & security
- Endpoint: <Need this>
- Connectivity & security
mysql -h `hra-database.cssi6ineszpw.us-east-1.rds.amazonaws.com` -u HRAadmin -p toolingdb < tooling-db.sql

sed -i "s/$db = mysqli_connect('mysql.tooling.svc.cluster.local', 'admin', 'admin', 'tooling');/$db = mysqli_connect('hra-database.cssi6ineszpw.us-east-1.rds.amazonaws.com', 'HRAadmin', 'admin12345', 'toolingdb');/g" functions.php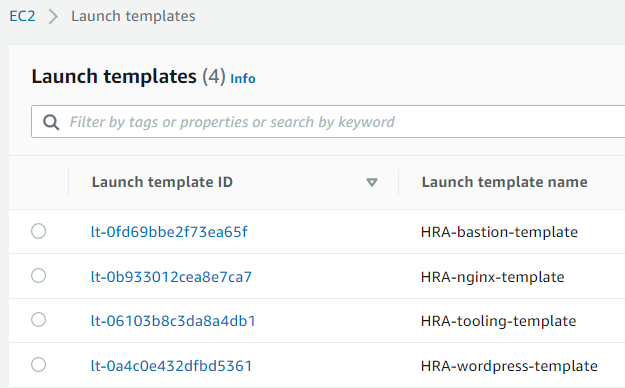
Create Auto Scaling Group
EC2 > Auto Scaling > Auto Scaling Groups > Create Auto Scaling group
-
Step 1
- Name
- Auto Scaling group name: HRA-bastion
- Launch template
- Launch template: HRA-bastion-template
- Name
-
Step 2
- Instance purchase options: Adhere to launch template
Network- VPC: HRA-VPC
Subnet:- HRA-public-subnet-1
HRA-public-subnet-2
- HRA-public-subnet-1
- VPC: HRA-VPC
- Instance purchase options: Adhere to launch template
-
Step 3
- Load balancing: No load balancer
Health checks: ELB (put a check mark)
- Load balancing: No load balancer
-
Step 4
- Group size: Everything 1
Scaling policies: Target tracking scaling policy
Target value: 90
- Group size: Everything 1
-
Step 5
- Add notifications
- SNS Topic:
<drop down>- Create a topic
- Send a notification to: HRA Notification
- With these recipients:
<email>
- Create a topic
- SNS Topic:
- Add notifications
-
Step 6
- Add tags
- Name HRA-bastion
- Add tags
-
Step 1
- Name
- Auto Scaling group name: HRA-nginx
- Launch template
- Launch template: HRA-nginx-template
- Name
-
Step 2
- Instance purchase options: Adhere to launch template
Network- VPC: HRA-VPC
Subnet:- HRA-public-subnet-1
HRA-public-subnet-2
- HRA-public-subnet-1
- VPC: HRA-VPC
- Instance purchase options: Adhere to launch template
-
Step 3
- Load balancing: Attach to an existing load balancer
Attach to an existing load balancer: Choose from your load balancer target group
Existing load balancer target groups: HRA-nginx-target
Health checks: ELB (put a check mark)
- Load balancing: Attach to an existing load balancer
-
Step 4
- Group size: Everything 1
Scaling policies: Target tracking scaling policy
Target value: 90
- Group size: Everything 1
-
Step 5
- Add notifications
- SNS Topic:
<drop down>- Create a topic
- Send a notification to: HRA Notification
- With these recipients:
<email>
- Create a topic
- SNS Topic:
- Add notifications
-
Step 6
- Add tags
- Name HRA-nginx
- Add tags
Create database wordpressdb and toolingdb
Now I’ll use Bastion Instance to connect to RDS
We need the Endpoint of HRA-database
RDS > Databases > HRA-database > Connectivity & security
- Endpoint:
hra-database.cssi6ineszpw.us-east-1.rds.amazonaws.com
[ec2-user@ip-10-0-3-86 ~]$ mysql -h hra-database.cssi6ineszpw.us-east-1.rds.amazonaws.com -u HRAadmin -p #<<<
Enter password:
Welcome to the MySQL monitor.  Commands end with ; or \g.
Your MySQL connection id is 33
Server version: 8.0.27 Source distribution

Copyright (c) 2000, 2021, Oracle and/or its affiliates.

Oracle is a registered trademark of Oracle Corporation and/or its
affiliates. Other names may be trademarks of their respective
owners.

Type 'help;' or '\h' for help. Type '\c' to clear the current input statement.

mysql> CREATE DATABASE toolingdb; #<<<
Query OK, 1 row affected (0.01 sec)

mysql> CREATE DATABASE wordpressdb; #<<<
Query OK, 1 row affected (0.01 sec)

mysql> show databases;
+--------------------+
| Database           |
+--------------------+
| information_schema |
| mysql              |
| performance_schema |
| sys                |
| toolingdb          |#<<<
| wordpressdb        |#<<<
+--------------------+
6 rows in set (0.00 sec)

mysql>-
Step 1
- Name
- Auto Scaling group name: HRA-wordpress
- Launch template
- Launch template: HRA-wordpress-template
- Name
-
Step 2
- Instance purchase options: Adhere to launch template
Network- VPC: HRA-VPC
Subnet:- HRA-private-subnet-1
HRA-private-subnet-2
- HRA-private-subnet-1
- VPC: HRA-VPC
- Instance purchase options: Adhere to launch template
-
Step 3
- Load balancing: Attach to an existing load balancer
Attach to an existing load balancer: Choose from your load balancer target group
Existing load balancer target groups: HRA-wordpress-target (HRA-int-ALB)
Health checks: ELB (put a check mark)
- Load balancing: Attach to an existing load balancer
-
Step 4
Group size: Everything 1
Scaling policies: Target tracking scaling policy
Target value: 90 -
Step 5
- Add notifications
- SNS Topic: <drop down>
- Create a topic
- Send a notification to: HRA Notification
With these recipients: <email>
- Send a notification to: HRA Notification
- Create a topic
- SNS Topic: <drop down>
- Add notifications
-
Step 6
- Add tags
- Name HRA-wordpress
- Add tags
-
Step 1
- Name
- Auto Scaling group name: HRA-tooling
- Launch template
- Launch template: HRA-tooling-template
- Name
-
Step 2
- Instance purchase options: Adhere to launch template
- Network
- VPC: HRA-VPC
- Subnet:
- HRA-private-subnet-1
HRA-private-subnet-2
- HRA-private-subnet-1
-
Step 3
Load balancing: Attach to an existing load balancer
Attach to an existing load balancer: Choose from your load balancer target group
Existing load balancer target groups: HRA-tooling-target (HRA-int-ALB)
Health checks: ELB (put a check mark) -
Step 4
Group size: Everything 1
Scaling policies: Target tracking scaling policy
Target value: 90 -
Step 5
- Add notifications
- SNS Topic: <drop down>
- Create a topic
- Send a notification to: HRA Notification With these recipients: <email>
- SNS Topic: <drop down>
- Add notifications
-
Step 6
- Add tags
- Name HRA-tooling
- Add tags
Create records in Route 53 to route traffic to HRA-ext-ALB
Create records for:
tooling.hracompany.ga
www.tooling.hracompany.ga
wordpress.hracompany.ga
www.wordpress.hracompany.ga
Route 53 > Hosted zones > hracompany.ga > Create record
- Quick create record
- Record name <Name>
- Record type: A - Routes traffic to an IPv4 address and some AWS resources
Route traffic to
- Alias to Application and Classic Load Balancer US East (N. Virginia) [us-east-1] HRA-ext-ALB
Creating one record
Created records for:
tooling.hracompany.ga
www.tooling.hracompany.ga
wordpress.hracompany.ga
www.wordpress.hracompany.ga
Adding certificate to Internal Load Balancer
Testing URL