(old LEMP )
LEMP STACK IMPLEMENTATION
A technology stack is a set of frameworks and tools used to develop a software product. Here we will implement a LEMP which consits of Linux, E is for Nginx (engine-x), MySQL, PHP|Python|Perl.
Technologies/Tools used:
- AWS (EC2)
- Ubuntu Server 20.04 LTS
- Nginx
- MySQL
- PHP
- GitBash
Before we start we need to have an environment to work with. I will we using my AWS account to create an EC2 instance with an Ubuntu Server.
-
First thing I’m going to do when I log in to AWS is look for the EC2 services. There are various methods to navigate to it, here I’m using the search bar

-
Once you navigate to the EC2 page look for a Launch instance button

-
You will then be prompted to pick an OS Image. I will be using Ubuntu Server 20.04 LTS (HVM), SSD Volume. Once done click Select
-
I will pick the t2.micro instace type

-
I will leave default settings and click Review and Launch

-
As you can see we have a Security Group applied to the instance by default which allows SSH connections

-
After reviewing you can launch your instancing by clicking

-
We are prompted to create or use an existing Key Pair. I will be creating a new one. I will use this .pem key to SSH into the instance later on.

-
Once you have downloaded your key launch intance

-
To go to the instances dashboard

-
If your instance is up and running you will see something like this

-
To find information on how to connect click on your Instance ID
-
In the top-right corner you should see the button Connect, click on it

-
Look for the SSH client tab

-
Under Example you’ll find an ssh command with eveything you need to connect to the instance from a terminal
Examaple:
ssh -i "daro.io.pem" ubuntu@ec2-3-216-90-84.compute-1.amazonaws.comMake sure when you run the command that your current working directory in the terminal is where your KeyPair/.pem is located because in the above example I’m using a relative path to point to my key
- A successful log-in

Installing the Nginx Web Server
-
We will install Nginx (a high-performance web server) using Ubuntu’s package manager apt
- Update list of packages in package manager
sudo apt udpate- To install apache2 package
sudo apt install nginx- Alternatively you can put everything together in one line
sudo apt update && sudo apt install nginx -yThe -y puts yes whenever the systems asks during install
- To make sure apache is running
systemctl status nginx -
To test your page by accessing it locally you can run the following
curl http://localhost:80

curl http://127.0.0.1:80
This will just display HTML code in your terminal
- To test it externally use a browser with the server’s public IP
http://<Public-IP-Address>:80You can find your Public IP Address running this cmd on the terminal
curl -s http://169.254.169.254/latest/meta-data/public-ipv4- If your page is up and running you will see nginx sample page

The URL in browser shall also work if you do not specify port number since all web browsers use port 80 by default.
Installing Mysql
- We will again use apt to install this software
sudo apt install mysql-server- When prompted, confirm installation by typing Y, and then ENTER.
- Once installation is done we will run a script that removes some insecure default settings and lock down access to your database system. To start the interactive script run:
sudo mysql_secure_installationAnd follow the wizard like questions
-
Will ask if you want to configure the VALIDATE PASSWORD PLUGIN. I’ll put yes for an additioanl layer of security

Keep answering the questions till the end -
When you’re finished, test if you’re able to log in to the MySQL console by typing:
sudo mysqlYou should see
mysql> - To exit type exit
mysql> exit
Bye
Installing PHP
-
Now you can install PHP to process code and generate dynamic content for the web server. Nginx requires an external program to handle PHP processing and act as a bridge between the PHP interpreter itself and the web server. You’ll need to install:
- php-fpm which stands for “PHP fastCGI process manager
- Need to configure Nginx to pass PHP requests to this software for processing.
- php-mysql a PHP module that allows PHP to communicate with MySQL-based databases. Core PHP packages will automatically be installed as dependencies.
- php-fpm which stands for “PHP fastCGI process manager
-
To install these 2 packages at once, run:
sudo apt install php-fpm php-mysql -yConfiguring Nginx to Use PHP Processor
-
To encapsulate configuration details and host more than one domain on a single server Nginx web server uses server block (the equivalent of virtual hosts in Apache)
-
On Ubuntu 20.04, Nginx has one server block enabled by default and is configured to serve documents out of a directory at /var/www/html. We’ll create a directory structure within /var/www for the your_domain website, leaving /var/www/html in place as the default directory to be served if a client request does not match any other sites.
-
Create the root web directory for your_domain as follows:
sudo mkdir /var/www/projectLEMP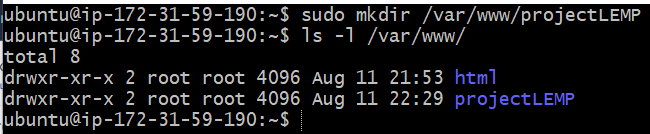
- Next, assign ownership of the directory with the $USER environment variable, which will reference your current system user:
sudo chown -R $USER:$USER /var/www/projectLEMPMy current user is ubuntu

- We’ll create a new configuration file in Nginx’s sites-available directory using nano command-line editor.
sudo nano /etc/nginx/sites-available/projectLEMPPaste in the following bare-bones configuration:
#/etc/nginx/sites-available/projectLEMP
server {
    listen 80;
    server_name projectLEMP www.projectLEMP;
    root /var/www/projectLEMP;
    index index.html index.htm index.php;
    location / {
        try_files $uri $uri/ =404;
    }
    location ~ \.php$ {
        include snippets/fastcgi-php.conf;
        fastcgi_pass unix:/var/run/php/php7.4-fpm.sock;
     }
     location ~ /\.ht {
        deny all;
    }
}
When done I’ll save and close the file by typing CTRL+X and then y and ENTER to confirm.
-
Here’s what each of these directives and location blocks do:
- listen — Defines what port Nginx will listen on.
- root — Defines the document root where the files served by this website are stored.
- index — Defines in which order Nginx will prioritize index files for this website.
- server_name — Defines which domain names and/or IP addresses this server block should respond for. Point this directive to your server’s domain name or public IP address.
- location / — The first location block includes a try_files directive, which checks for the existence of files or directories matching a URI request. If Nginx cannot find the appropriate resource, it will return a 404 error.
- location ~ .php$ — This location block handles the actual PHP processing by pointing Nginx to the fastcgi-php.conf configuration file and the php7.4-fpm.sock file, which declares what socket is associated with php-fpm.
- location ~ /.ht — The last location block deals with .htaccess files, which Nginx does not process. By adding the deny all directive, if any .htaccess files happen to find their way into the document root ,they will not be served to visitors.
-
I’ll activate the configuration by linking to the config file from Nginx’s sites-enabled directory to tell Nginx to use it next it it is reloaded
sudo ln -s /etc/nginx/sites-available/projectLEMP /etc/nginx/sites-enabled/- To test configuration for syntax errors I run
sudo nginx -tnginx: the configuration file /etc/nginx/nginx.conf syntax is ok
nginx: configuration file /etc/nginx/nginx.conf test is successful
- I’ll also disable Nginx’s default host
sudo unlink /etc/nginx/sites-enabled/default- To apply the changes need to reload nginx
sudo systemctl reload nginx- Now all we need is a page to host. We will create one in web root /var/www/projectLEMP
sudo echo 'Hello LEMP from hostname' $(curl -s http://169.254.169.254/latest/meta-data/public-hostname) 'with public IP' $(curl -s http://169.254.169.254/latest/meta-data/public-ipv4) > /var/www/projectLEMP/index.html
- Now we’ll try to open the website using a browser with the server’s IP address

Testing PHP with Nginx
-
Now that LEMP stack is fully configured. We’ll create a PHP script to test that Nginx is in fact able to handle .php files within our newly configured website.
-
We’ll do this using nano
sudo nano /var/www/projectLEMP/info.phpPaste this code code inside
<?php
phpinfo();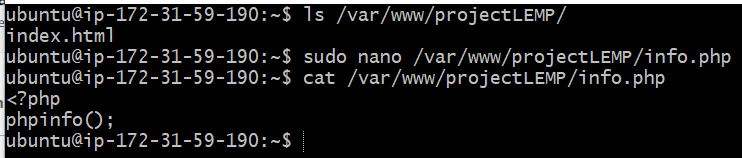
-
I’ll now access this page in my web browser using DNS address given by aws, followed by /info.php:
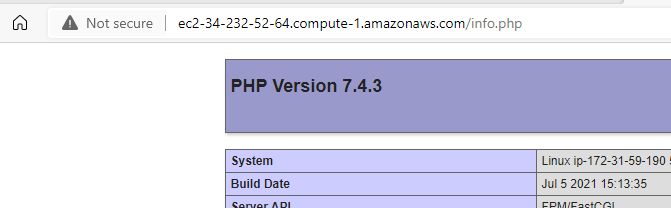
-
After testing and getting the information we need it is best practice to remove the script as it displays sentivie information about your system
sudo rm /var/www/your_domain/info.php- We try to access the script one more time to confirm

Retrieving data from MySQL database with PHP
-
We will create a database named example_database and a user named example_user
-
First, connect to the MySQL console using the root account:
sudo mysql- From your MySQL console run the following command to create the database
mysql> CREATE DATABASE `example_database`;
- Now lets create a user with mysql_native_password as default authentication method. Here I’m setting the password to Passw0rd!
mysql> CREATE USER 'example_user'@'%' IDENTIFIED WITH mysql_native_password BY 'password';
- To give the newly created user full privileges over the database run
mysql> GRANT ALL ON example_database.* TO 'example_user'@'%';
- Now exit the MySQL shell with:
mysql> exitmysql> exit
Bye
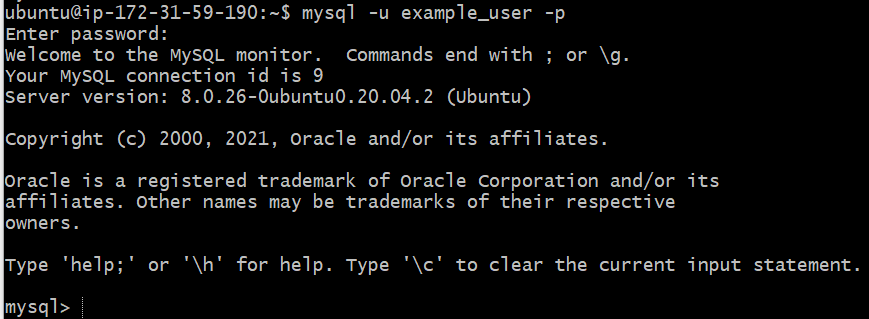
- We will logging in to the MySQl console using the custom user credentials to test the permissions
mysql -u example_user -p-p flag in this command, which will prompt you for the password
 `
`
After logging in to the MySQL console, confirm that you have access to the example_database database:
mysql> SHOW DATABASES;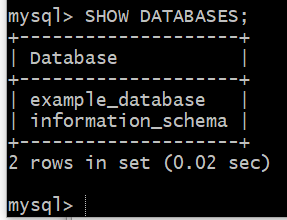
- Next, we’ll create a test table named todo_list by running the following from the MySQL console
CREATE TABLE example_database.todo_list (
mysql>     item_id INT AUTO_INCREMENT,
mysql>     content VARCHAR(255),
mysql>     PRIMARY KEY(item_id)
mysql> );
Keep in mind you are typing one line a time and pressing ENTER
#my output
mysql> CREATE TABLE example_database.todo_list (
    -> item_id INT AUTO_INCREMENT,
    -> content VARCHAR(255),
    -> PRIMARY KEY(item_id)
    -> );

Query OK, 0 rows affected (0.04 sec)- To insert content into our table
mysql> INSERT INTO example_database.todo_list (content) VALUES ("My first important item");#my output
mysql> INSERT INTO example_database.todo_list(content) VALUES ("Finishes Project 1");
Query OK, 1 row affected (0.00 sec)
mysql> INSERT INTO example_database.todo_list(content) VALUES ("Finishes Project 2");
Query OK, 1 row affected (0.01 sec)
mysql> INSERT INTO example_database.todo_list(content) VALUES ("Finishes Project 3");
Query OK, 1 row affected (0.01 sec)- To confirm that the data was successfully saved to your table, run:
mysql> SELECT * FROM example_database.todo_list;#my output
mysql> SELECT * FROM example_database.todo_list;
+---------+--------------------+
| item_id | content |
+---------+--------------------+
| 1 | Finishes Project 1 |
| 2 | Finishes Project 2 |
| 3 | Finishes Project 3 |
+---------+--------------------+
3 rows in set (0.00 sec)
- After confirming your table has data, you can exit MySQL console:
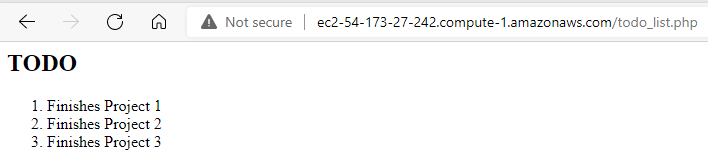
mysql> exit- Now we will create a PHP script that will connect to MySQL and query your content. First we create a file todo_list.php using nano
nano /var/www/projectLEMP/todo_list.phpWhen nano opens paste this code
<?php
$user = "example_user";
$password = "Passw0rd";
$database = "example_database";
$table = "todo_list";
try {
  $db = new PDO("mysql:host=localhost;dbname=$database", $user, $password);
  echo "<h2>TODO</h2><ol>";
  foreach($db->query("SELECT content FROM $table") as $row) {
    echo "<li>" . $row['content'] . "</li>";
  }
  echo "</ol>";
} catch (PDOException $e) {
    print "Error!: " . $e->getMessage() . "<br/>";
    die();
}
Save and close file
#Here I use cat to confirm code inside todo_list.php
ubuntu@ip-172-31-59-190:~$ nano /var/www/projectLEMP/todo_list.php
ubuntu@ip-172-31-59-190:~$ cat /var/www/projectLEMP/todo_list.php
<?php
$user = "example_user";
$password = "Passw0rd!";
$database = "example_database";
$table = "todo_list";

try {
  $db = new PDO("mysql:host=localhost;dbname=$database", $user, $password);
  echo "<h2>TODO</h2><ol>";
  foreach($db->query("SELECT content FROM $table") as $row) {
    echo "<li>" . $row['content'] . "</li>";
  }
  echo "</ol>";
} catch (PDOException $e) {
    print "Error!: " . $e->getMessage() . "<br/>";
    die();
}
ubuntu@ip-172-31-59-190:~$- Now to confirm everything works access this page in your browser by visiting domain name or public IP address configured for your website, followed by /todo_list.php: