(old MEAN)
Info
A technology stack is a set of frameworks and tools used to develop a software product. Here we will implement a MEAN stack which consits of:
MongoDB - No-SQL database (Document database)
ExpressJS - A server side Web Application framework for Node.js
Angular - Front-end application framework to handle Client and Server Requests
Node.js - A JavaScript runtime environment. It is used to run JavaScript on a machine rather than in a browser.For our example application, we are adding book records to MongoDB that contain book name ISBN number, Author, and number of pages
Technologies/Tools used:
- AWS (EC2)
- Ubuntu Server 20.04 LTS
- MonogDB
- ExpressJS
- Angular
- Node.js
- GitBash
Before we start we need to have an environemnt to work with. I will we using my AWS account to create an EC2 instance with an Ubuntu Server.
-
First thing I’m going to do when I log in to AWS is look for the EC2 services. There are various methods to navigate to it, here I’m using the search bar

-
Once you navigate to the EC2 page look for a Launch instance button

-
You will then be prompted to pick an OS Image. I will be using Ubuntu Server 20.04 LTS (HVM), SSD Volume. Once done click Select
-
I will pick the t2.micro instace type

-
I will leave default settings and click Review and Launch

-
As you can see we have a Security Group applied to the instance by default which allows SSH connections

-
After reviewing you can launch your instancing by clicking

-
We are prompted to create or use an existing Key Pair. I will be creating a new one. I will use this .pem key to SSH into the instance later on.

-
Once you have downloaded your key launch intance

-
To go to the instances dashboard

-
If your instance is up and running you will see something like this

-
To find information on how to connect click on your Instance ID
-
In the top-right corner you should see the button Connect, click on it

-
Look for the SSH client tab

-
Under Example you’ll find an ssh command with eveything you need to connect to the instance from a terminal
Examaple:
ssh -i "daro.io.pem" ubuntu@ec2-3-216-90-84.compute-1.amazonaws.comMake sure when you run the command that your current working directory in the terminal is where your KeyPair/.pem is located because in the above example I’m using a relative path to point to my key
- A successful log-in

Step 1: Install NodeJs
ubuntu@ip-172-31-87-202:~$ sudo apt update -y && sudo apt upgrade -y && sudo apt install nodejs -yStep 2: Install MongoDB
sudo apt-key adv --keyserver hkp://keyserver.ubuntu.com:80 --recv 0C49F3730359A14518585931BC711F9BA15703C6

echo "deb [ arch=amd64 ] https://repo.mongodb.org/apt/ubuntu trusty/mongodb-org/3.4 multiverse" | sudo tee /etc/apt/sources.list.d/mongodb-org-3.4.list

sudo apt install -y mongodb #Install MongoDB

sudo service mongodb start #Start The server

sudo systemctl status mongodb #Verify the service is running

sudo apt install -y npm #Install package manager
We need to install “body-parser” package to process JSON files passed in requests to the server
sudo npm install body-parserWe’ll create a folder Books make it our currently working directory and initialize npm project inside
ubuntu@ip-172-31-87-202:~$ mkdir Books && cd Books
ubuntu@ip-172-31-87-202:~/Books$ npm init
This utility will walk you through creating a package.json file.
It only covers the most common items, and tries to guess sensible defaults.

See `npm help json` for definitive documentation on these fields
and exactly what they do.

Use `npm install <pkg>` afterwards to install a package and
save it as a dependency in the package.json file.

Press ^C at any time to quit.
package name: (books)
Add a file to Books named server.js and the put the following code inside
vi server.jsvar express = require('express');
var bodyParser = require('body-parser');
var app = express();
app.use(express.static(__dirname + '/public'));
app.use(bodyParser.json());
require('./apps/routes')(app);
app.set('port', 3300);
app.listen(app.get('port'), function() {À
console.log('Server up: http://localhost:' + app.get('port'));
});Step 3: Install Express and set up routes to the server
We will use Express in to pass book information to and from our MongoDB database.
We will use Mongoose package to establish a schema for the database to store data of our book register
sudo npm install express mongooseWe’ll create a directory apps inside of directory Books
mkdir apps && cd appsInside of apps create file routes.js with the following code inside
vi routesvar Book = require('./models/book');
module.exports = function(app) {
app.get('/book', function(req, res) {
Book.find({}, function(err, result) {
if ( err ) throw err;
res.json(result);
});
});
app.post('/book', function(req, res) {
var book = new Book( {
name:req.body.name,
isbn:req.body.isbn,
author:req.body.author,
pages:req.body.pages
});
book.save(function(err, result) {
if ( err ) throw err;
res.json( {
message:"Successfully added book",
book:result
});
});
});
app.delete("/book/:isbn", function(req, res) {
Book.findOneAndRemove(req.query, function(err, result) {
if ( err ) throw err;
res.json( {
message: "Successfully deleted the book",
book: result
});
});
});
var path = require('path');
app.get('*', function(req, res) {
res.sendfile(path.join(__dirname + '/public', 'index.html'));
});
};We’ll create a directory models inside of apps
mkdir models && cd modelsInside of apps we’ll create a file book.js with the following code
var mongoose = require('mongoose');
var dbHost = 'mongodb://localhost:27017/test';
mongoose.connect(dbHost);
mongoose.connection;
mongoose.set('debug', true);
var bookSchema = mongoose.Schema( {
  name: String,
  isbn: {type: String, index: true},
  author: String,
  pages: Number
});
var Book = mongoose.model('Book', bookSchema);
module.exports = mongoose.model('Book', bookSchema);
Step 4 – Access the routes with AngularJS
We’ll use AngularJS to connect our web page with Express and perform actions on our book register.
Inside of directory Books we’ll create a directory called public
mkdir public && cd publicInside of public create file script.js with the following code
vi scrip.jsvar app = angular.module('myApp', []);
app.controller('myCtrl', function($scope, $http) {
$http( {
method: 'GET',
url: '/book'
}).then(function successCallback(response) {
$scope.books = response.data;
}, function errorCallback(response) {
console.log('Error: ' + response);
});
$scope.del_book = function(book) {
$http( {
method: 'DELETE',
url: '/book/:isbn',
params: {'isbn': book.isbn}
}).then(function successCallback(response) {
console.log(response);
}, function errorCallback(response) {
console.log('Error: ' + response);
});
};
$scope.add_book = function() {
var body = '{ "name": "' + $scope.Name +
'", "isbn": "' + $scope.Isbn +
'", "author": "' + $scope.Author +
'", "pages": "' + $scope.Pages + '" }';
$http({
method: 'POST',
url: '/book',
data: body
}).then(function successCallback(response) {
console.log(response);
}, function errorCallback(response) {
console.log('Error: ' + response);
});
};
});Inside of directory public we’ll create a file index.html with the following code
vi index.html<!doctype html>
<html ng-app="myApp" ng-controller="myCtrl">
<head>
<script src="https://ajax.googleapis.com/ajax/libs/angularjs/1.6.4/angular.min.js"></script>
<script src="script.js"></script>
</head>
<body>
<div>
<table>
<tr>
<td>Name:</td>
<td><input type="text" ng-model="Name"></td>
</tr>
<tr>
<td>Isbn:</td>
<td><input type="text" ng-model="Isbn"></td>
</tr>
<tr>
<td>Author:</td>
<td><input type="text" ng-model="Author"></td>
</tr>
<tr>
<td>Pages:</td>
<td><input type="number" ng-model="Pages"></td>
</tr>
</table>
<button ng-click="add_book()">Add</button>
</div>
<hr>
<div>
<table>
<tr>
<th>Name</th>
<th>Isbn</th>
<th>Author</th>
<th>Pages</th>
</tr>
<tr ng-repeat="book in books">
<td>{{book.name}}</td>
<td>{{book.isbn}}</td>
<td>{{book.author}}</td>
<td>{{book.pages}}</td>
<td><input type="button" value="Delete" data-ng-click="del_book(book)"></td>
</tr>
</table>
</div>
</body>
</html>Now we’ll run server.js by running the following command (make sure your current working directory is Books)
node server.jsNow we are going to add a rule to our Security Group to open TCP port 3300
* Navigate to your intances dashboard and select your instance by cliking the empty box

* Look for the Security tab

* Click on top of your Security Group
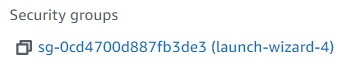
Keep in mind yours might look different
* Under the tab Inbound Rules click Edit inbound rules button

* Click Add rule
* Pick type Custom TCP and source 0.0.0.0/0 meaning all IPs, you can also use drop-down menu Anywhere-IPv4
* Save it

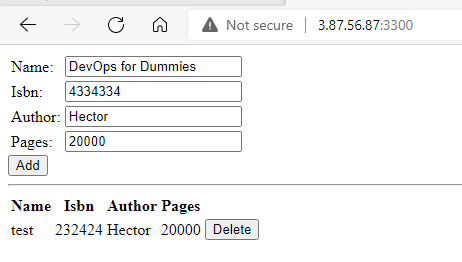
- I will now test the Web Book Register Application on the browser using the AWS EC2 Intance Public IP followed by the port 3300