(old Project 6)
Info
In this project we will prepare storage infrastructure on two Linux servers and implement a basic web solution using WordPress. This will be implemented based on what is called the Three-tier Architecture.
In this project:
- Presentation Layer (PL): Any Browser (user interface)
- Business Layer (BL): An EC2 Linux Server as a web server (where WordPress is running)
- Data Access or Management Layer (DAL): An EC2 Linux server as a database (DB) server (MySQL)
We will create EBS Volumes partition them, create Volume Groups, create Logical Volumes format and mount them.
Technologies/Tools used:
- AWS (EC2)(EBS)
- Red Hat Enterprise Linux 8 (HVM)
- MySQL
- Wordpress
- GitBash
Before we start we need to have an environment to work with. I will we using my AWS account to create two EC2 instances (Webserver and DB Server)with Red-Hat as the OS.
Use link: Creating Red Hat instance in AWS
We need to know which availability zone this instance is in when attaching EBS. Go to the list of instances to check. My example shows (instance which I named) Project6 is in availability zone us-east-1c

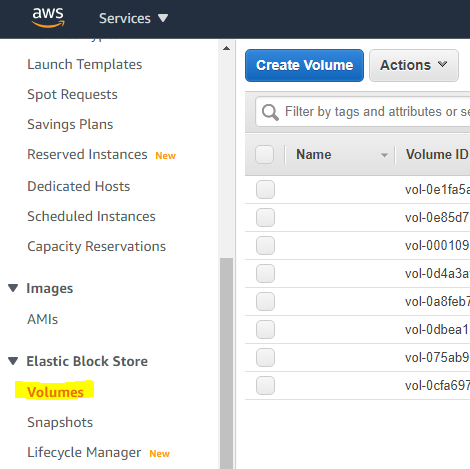
I will now create Elastic Block Volumes by going to Elastic Block Store > Volumes > Create Volume
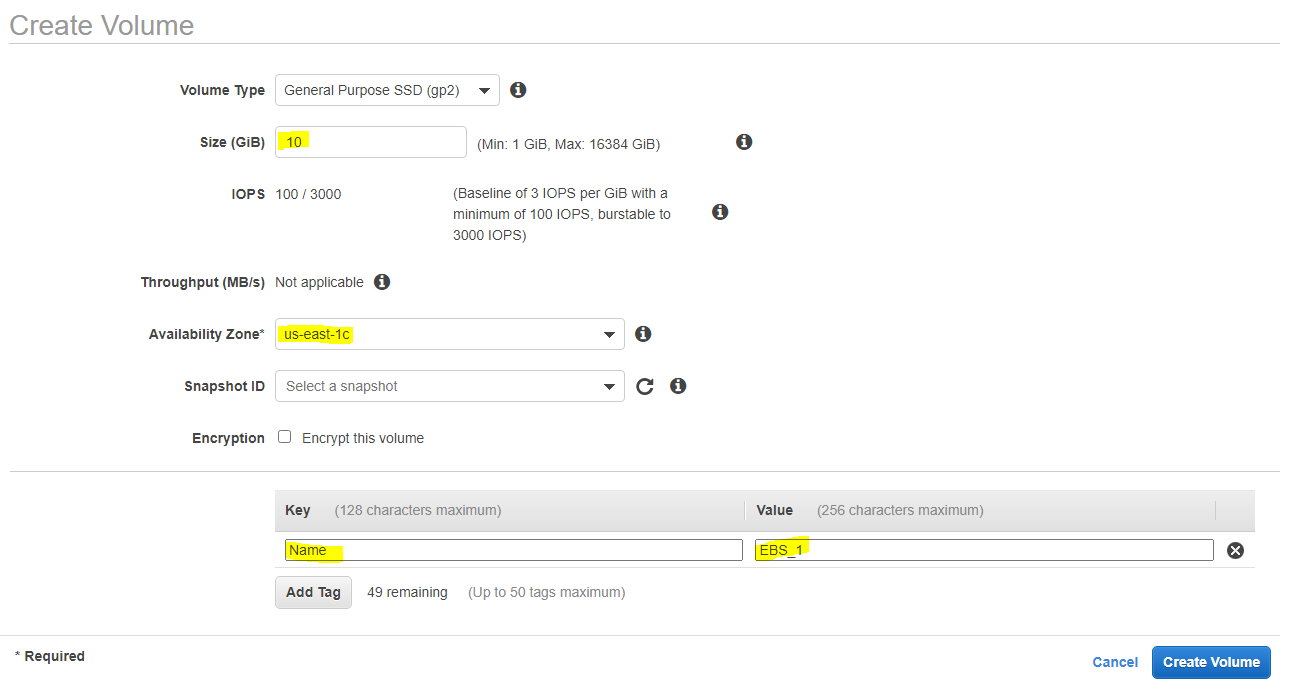
Once prompted we’ll change the size to 10GB, make sure availability zone is the same as instance. In my case us-east-1c. In addition, I will add a tag to name the volume
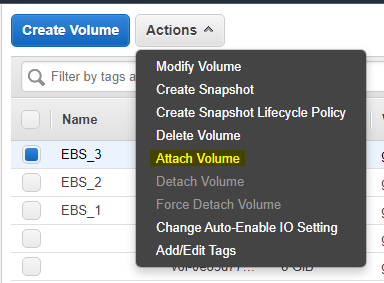
We’ll create 3 Volumes in total. Once created we’ll attachment them to the instance one-by-one
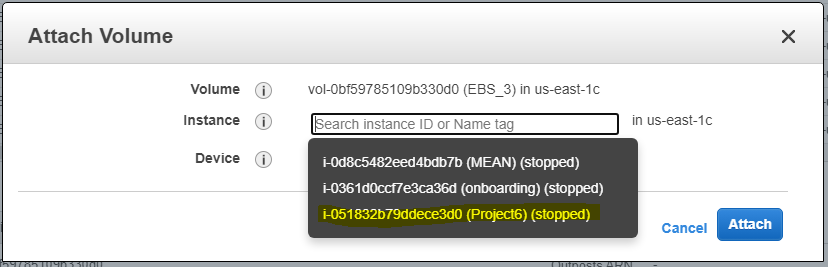
You should see a list of instances in the same availability zone as the EBS Volumes, I’m using Project6
Now I’ll login to instnace with the role of Webserver
On the Red-Hat terminal using lsblk I can see the volumes attached as xvdf, xvdg, xvdh.
[ec2-user@ip-172-31-86-213 ~]$ lsblk
NAME    MAJ:MIN RM SIZE RO TYPE MOUNTPOINT
xvda    202:0    0  10G  0 disk
├─xvda1 202:1    0   1M  0 part
└─xvda2 202:2    0  10G  0 part /
xvdf    202:80   0  10G  0 disk
xvdg    202:96   0  10G  0 disk
xvdh    202:112  0  10G  0 disk
[ec2-user@ip-172-31-86-213 ~]$
Using gedisk we’ll create a partition on each of these 3 volumes. I’ll keep the defaults which uses the entire Volume. The only thing I’ll specify is Partition type with code 8300 for Linux filesystem
Hex code or GUID (L to show codes, Enter = 8300):
Changed type of partition to 'Linux filesystem'
Output when I did it in xvdf
[ec2-user@ip-172-31-86-213 ~]$ sudo gdisk /dev/xvdf
GPT fdisk (gdisk) version 1.0.3

Partition table scan:
  MBR: protective
  BSD: not present
  APM: not present
  GPT: present

Found valid GPT with protective MBR; using GPT.

Command (? for help): p
Disk /dev/xvdf: 20971520 sectors, 10.0 GiB
Sector size (logical/physical): 512/512 bytes
Disk identifier (GUID): F4BDB498-3A7D-4AD5-A5E9-1C5C6684B646
Partition table holds up to 128 entries
Main partition table begins at sector 2 and ends at sector 33
First usable sector is 34, last usable sector is 20971486
Partitions will be aligned on 2048-sector boundaries
Total free space is 20971453 sectors (10.0 GiB)

Number  Start (sector)    End (sector)  Size       Code  Name

Command (? for help): n
Partition number (1-128, default 1):
First sector (34-20971486, default = 2048) or {+-}size{KMGTP}:
Last sector (2048-20971486, default = 20971486) or {+-}size{KMGTP}:
Current type is 'Linux filesystem'
Hex code or GUID (L to show codes, Enter = 8300):
Changed type of partition to 'Linux filesystem'

Command (? for help): p
Disk /dev/xvdf: 20971520 sectors, 10.0 GiB
Sector size (logical/physical): 512/512 bytes
Disk identifier (GUID): F4BDB498-3A7D-4AD5-A5E9-1C5C6684B646
Partition table holds up to 128 entries
Main partition table begins at sector 2 and ends at sector 33
First usable sector is 34, last usable sector is 20971486
Partitions will be aligned on 2048-sector boundaries
Total free space is 2014 sectors (1007.0 KiB)

Number  Start (sector)    End (sector)  Size       Code  Name
   1            2048        20971486   10.0 GiB    8300  Linux filesystem

Command (? for help): w

Final checks complete. About to write GPT data. THIS WILL OVERWRITE EXISTING
PARTITIONS!!

Do you want to proceed? (Y/N): y
OK; writing new GUID partition table (GPT) to /dev/xvdf.
The operation has completed successfully.
[ec2-user@ip-172-31-86-213 ~]$
If we run lsblk again we see
xvdf    202:80   0  10G  0 disk
└─xvdf1 202:81   0  10G  0 part
xvdg    202:96   0  10G  0 disk
└─xvdg1 202:97   0  10G  0 part
xvdh    202:112  0  10G  0 disk
└─xvdh1 202:113  0  10G  0 part
We will need to install lvm2 a device mapper framework that provides logical volume management for the Linux kernel.
sudo yum install lvm2Now we can use lvmdiskscan to see available partitions. The below output shows 4 partitions including the 3 newly created ones
[ec2-user@ip-172-31-86-213 ~]$ sudo lvmdiskscan
  /dev/xvda2 [     <10.00 GiB]
  /dev/xvdf1 [     <10.00 GiB] #new
  /dev/xvdg1 [     <10.00 GiB] #new
  /dev/xvdh1 [     <10.00 GiB] #new
  0 disks
  4 partitions
  0 LVM physical volume whole disks
  0 LVM physical volumes

[ec2-user@ip-172-31-86-213 ~]$
Now we have to turn these 3 Partitions into Physical Volumes using pvcreate
[ec2-user@ip-172-31-86-213 ~]$ sudo pvcreate /dev/xvdf1 /dev/xvdg1 /dev/xvdh1
  Physical volume "/dev/xvdf1" successfully created.
  Physical volume "/dev/xvdg1" successfully created.
  Physical volume "/dev/xvdh1" successfully created.
[ec2-user@ip-172-31-86-213 ~]$
If we run lvmdiskscan again we see the partitions are now LVM physical volumes
[ec2-user@ip-172-31-86-213 ~]$ sudo lvmdiskscan
  /dev/xvda2 [     <10.00 GiB]
  /dev/xvdf1 [     <10.00 GiB] LVM physical volume
  /dev/xvdg1 [     <10.00 GiB] LVM physical volume
  /dev/xvdh1 [     <10.00 GiB] LVM physical volume
  0 disks
  1 partition
  0 LVM physical volume whole disks
  3 LVM physical volumes

[ec2-user@ip-172-31-86-213 ~]$
Now we’ll combine these physical volumes to create a Volume Group called webdata-vg using command vgcreate
[ec2-user@ip-172-31-86-213 ~]$ sudo vgcreate webdata-vg /dev/xvdh1 /dev/xvdg1 /dev/xvdf1
  Volume group "webdata-vg" successfully created
[ec2-user@ip-172-31-86-213 ~]$
Lets verify Volume Group creation using vgs
[ec2-user@ip-172-31-86-213 ~]$ sudo vgs
  VG         #PV #LV #SN Attr   VSize   VFree
  webdata-vg   3   0   0 wz--n- <29.99g <29.99g
[ec2-user@ip-172-31-86-213 ~]$
Now lets create 2 Logical Volumes apps-lv and logs-lv 14GB in size from the newly create Volume Group
[ec2-user@ip-172-31-86-213 ~]$ sudo lvcreate -n apps-lv -L 14G webdata-vg
  Logical volume "apps-lv" created.
[ec2-user@ip-172-31-86-213 ~]$ sudo lvcreate -n logs-lv -L 14G webdata-vg
  Logical volume "logs-lv" created.
To verify the new Logical Volumes run lvs
[ec2-user@ip-172-31-86-213 ~]$ sudo lvs
  LV      VG         Attr       LSize  Pool Origin Data%  Meta%  Move Log Cpy%Sync Convert
  apps-lv webdata-vg -wi-a----- 14.00g
  logs-lv webdata-vg -wi-a----- 14.00g
[ec2-user@ip-172-31-86-213 ~]$
To look at the entire setup you can run vgdisplay -v
[ec2-user@ip-172-31-86-213 ~]$ sudo vgdisplay -v
  --- Volume group ---
  VG Name               webdata-vg
  System ID
  Format                lvm2
  Metadata Areas        3
  Metadata Sequence No  3
  VG Access             read/write
  VG Status             resizable
  MAX LV                0
  Cur LV                2
  Open LV               0
  Max PV                0
  Cur PV                3
  Act PV                3
  VG Size               <29.99 GiB
  PE Size               4.00 MiB
  Total PE              7677
  Alloc PE / Size       7168 / 28.00 GiB
  Free  PE / Size       509 / <1.99 GiB
  VG UUID               HSA3Cm-vid3-4KJ7-dPpd-eMxl-tQ3L-W1zuuk

  --- Logical volume ---
  LV Path                /dev/webdata-vg/apps-lv
  LV Name                apps-lv
  VG Name                webdata-vg
  LV UUID                lA9NKo-oGad-Xk4Z-pEpp-t1Q5-T9g1-vLVGn6
  LV Write Access        read/write
  LV Creation host, time ip-172-31-86-213.ec2.internal, 2021-09-04 23:25:03 +0000
  LV Status              available
  # open                 0
  LV Size                14.00 GiB
  Current LE             3584
  Segments               2
  Allocation             inherit
  Read ahead sectors     auto
  - currently set to     8192
  Block device           253:0

  --- Logical volume ---
  LV Path                /dev/webdata-vg/logs-lv
  LV Name                logs-lv
  VG Name                webdata-vg
  LV UUID                ygkcxz-Ul2W-TxDw-pgYP-3LrR-5pz5-p8QdM1
  LV Write Access        read/write
  LV Creation host, time ip-172-31-86-213.ec2.internal, 2021-09-04 23:25:19 +0000
  LV Status              available
  # open                 0
  LV Size                14.00 GiB
  Current LE             3584
  Segments               2
  Allocation             inherit
  Read ahead sectors     auto
  - currently set to     8192
  Block device           253:1

  --- Physical volumes ---
  PV Name               /dev/xvdh1
  PV UUID               dJ5O9U-dSiK-zJMu-ZYJl-50t1-uIHA-ZzCNpi
  PV Status             allocatable
  Total PE / Free PE    2559 / 0

  PV Name               /dev/xvdg1
  PV UUID               e4jN5M-Ld0w-ovkT-Vvad-CLdy-29pN-7vKLcl
  PV Status             allocatable
  Total PE / Free PE    2559 / 509

  PV Name               /dev/xvdf1
  PV UUID               iURybq-N3Ib-WPCr-oRLY-pUNN-H141-RnzRwB
  PV Status             allocatable
  Total PE / Free PE    2559 / 0


[ec2-user@ip-172-31-86-213 ~]$
Now if we run lsblk again we can see the partitions, volume group and logical volumes
xvdf                     202:80   0  10G  0 disk
└─xvdf1                  202:81   0  10G  0 part
  └─webdata--vg-logs--lv 253:1    0  14G  0 lvm
xvdg                     202:96   0  10G  0 disk
└─xvdg1                  202:97   0  10G  0 part
  ├─webdata--vg-apps--lv 253:0    0  14G  0 lvm
  └─webdata--vg-logs--lv 253:1    0  14G  0 lvm
xvdh                     202:112  0  10G  0 disk
└─xvdh1                  202:113  0  10G  0 part
  └─webdata--vg-apps--lv 253:0    0  14G  0 lvm
Format the Logical Volumes to ext4
sudo mkfs -t ext4 /dev/webdata-vg/apps-lv
sudo mkfs -t ext4 /dev/webdata-vg/logs-lv
We need to create directories
[ec2-user@ip-172-31-86-213 ~]$ sudo mkdir -p /var/www/html #will be used as mounting point
[ec2-user@ip-172-31-86-213 ~]$ sudo mkdir -p /home/recovery/logs #temporary dir
We will use the following as the mountpoints for our Logical Volumes
/var/www/html
/var/log
Before we can use /var/log as a mountpoint we need to move its contents to a temporary location /home/recovery/logs and put it back after mount. The process of mounting deletes contents of a folder
[ec2-user@ip-172-31-86-213 ~]$ sudo mount /dev/webdata-vg/apps-lv /var/www/html/ #first mountMoving files/logs to temporary dir
[ec2-user@ip-172-31-86-213 logs]$ sudo rsync -av /var/log/. /home/recovery/logs
sending incremental file list #Partial output
./
boot.log
btmp
...
...
...
...
sent 13,460,465 bytes  received 808 bytes  8,974,182.00 bytes/sec
total size is 13,454,303  speedup is 1.00
[ec2-user@ip-172-31-86-213 logs]$
Now we can mount and return the file/logs to original place
[ec2-user@ip-172-31-86-213 logs]$ sudo mount /dev/webdata-vg/logs-lv /var/log #mounting
[ec2-user@ip-172-31-86-213 logs]$ sudo rsync -av /home/recovery/logs/. /var/log #putting files back
sending incremental file list
./
boot.log
…
….
…..
sent 13,460,466 bytes  received 808 bytes  8,974,182.67 bytes/sec
total size is 13,454,303  speedup is 1.00
[ec2-user@ip-172-31-86-213 logs]$
You can see your mounts by running df -h
[ec2-user@ip-172-31-86-213 ~]$ df -h
Filesystem                        Size  Used Avail Use% Mounted on
devtmpfs                          377M     0  377M   0% /dev
tmpfs                             404M     0  404M   0% /dev/shm
tmpfs                             404M   11M  393M   3% /run
tmpfs                             404M     0  404M   0% /sys/fs/cgroup
/dev/xvda2                         10G  1.3G  8.8G  13% /
tmpfs                              81M     0   81M   0% /run/user/1000
/dev/mapper/webdata--vg-apps--lv   14G   41M   13G   1% /var/www/html #here
/dev/mapper/webdata--vg-logs--lv   14G   53M   13G   1% /var/log      #here
These mounts will not persist after boot. So we need to add them to /etc/fstab using a file editor like vi
sudo vi /etc/fstabBefore editing we need to get the UUID of the device we are trying to mount. We can also use the path but UUID is recommended. To see device UUIDs run blkid
[ec2-user@ip-172-31-86-213 ~]$ sudo blkid
/dev/xvda2: UUID="c9aa25ee-e65c-4818-9b2f-fa411d89f585" BLOCK_SIZE="512" TYPE="xfs" PARTUUID="b3824610-751c-49f8-a4a9-068fa13d9460"
/dev/xvdh1: UUID="dJ5O9U-dSiK-zJMu-ZYJl-50t1-uIHA-ZzCNpi" TYPE="LVM2_member" PARTLABEL="Linux filesystem" PARTUUID="597ef000-2a42-4862-951d-4f69809de14d"
/dev/xvdg1: UUID="e4jN5M-Ld0w-ovkT-Vvad-CLdy-29pN-7vKLcl" TYPE="LVM2_member" PARTLABEL="Linux filesystem" PARTUUID="64aa68d6-57d6-4bda-a9c7-0e6fd4fdd08f"
/dev/xvdf1: UUID="iURybq-N3Ib-WPCr-oRLY-pUNN-H141-RnzRwB" TYPE="LVM2_member" PARTLABEL="Linux filesystem" PARTUUID="6d3527e6-3498-4402-8370-6adfa9676a75"
#These
/dev/mapper/webdata--vg-apps--lv: UUID="ebcfa2a8-c68e-4602-b59e-f1509690ff5b" BLOCK_SIZE="4096" TYPE="ext4"
/dev/mapper/webdata--vg-logs--lv: UUID="3b9c7f88-da27-42ac-8a55-a6a5ef159856" BLOCK_SIZE="4096" TYPE="ext4"
#two
/dev/xvda1: PARTUUID="3e18b896-4879-4ede-8711-a58017aff81c"
Now our entry in the fstab looks like this
UUID=c9aa25ee-e65c-4818-9b2f-fa411d89f585 /                       xfs     defaults        0 0

#Wordpress related mounts
UUID=ebcfa2a8-c68e-4602-b59e-f1509690ff5b /var/www/html           ext4    defaults        0 0
UUID=3b9c7f88-da27-42ac-8a55-a6a5ef159856 /var/log                ext4    defaults        0 0
Save the changes and run
sudo mount -aIf you get any output the is something wrong with the file. Fix or your system might not be able to boot next time.
To convert configuration files that are not native unit files dynamically into native unit file run
sudo systemctl daemon-reloadInstall WordPress on your Web Server EC2
#Update reposity
sudo yum -y update
#Install wget, Apache, php
sudo yum -y install wget httpd php php-mysqlnd php-fpm php-json
#Start Apache
sudo systemctl start httpd
#start Apache on boot
sudo systemctl enable httpd
#PHP and dependencies
sudo yum install https://dl.fedoraproject.org/pub/epel/epel-release-latest-8.noarch.rpm
sudo yum install yum-utils http://rpms.remirepo.net/enterprise/remi-release-8.rpm
sudo yum module list php
sudo yum module reset php
sudo yum module enable php:remi-7.4
sudo yum install php php-opcache php-gd php-curl php-mysqlnd
sudo systemctl start php-fpm
sudo systemctl enable php-fpm #start php on boot
setsebool -P httpd_execmem 1 #To allow httpd to execute files
#restart Apache
sudo systemctl restart httpd
#Downloading wordpress
mkdir wordpress
cd   wordpress
sudo wget http://wordpress.org/latest.tar.gz
sudo tar xzvf latest.tar.gz #unziping
sudo rm -rf latest.tar.gz #removing
sudo cp wordpress/wp-config-sample.php wordpress/wp-config.php #creating config from sample
sudo cp -R wordpress /var/www/html/
#Configure SELinux Policies
sudo chown -R apache:apache /var/www/html/wordpress #chaging owner of wordpress
sudo chcon -t httpd_sys_rw_content_t /var/www/html/wordpress -R
sudo setsebool -P httpd_can_network_connect=1 #Allow HTTPD scripts and modules to connect to the network
Instance with DB Role
I will repeat the same steps as far as creating 3 EBS Volumes and creating 2 Logical Volumes, db-lv mounted in /db and logs-lv mounted in /var/logs
Just like with Webserver for the mount to persist we need to added in fstab
[ec2-user@ip-172-31-19-178 ~]$ cat /etc/fstab
UUID=c9aa25ee-e65c-4818-9b2f-fa411d89f585 /                       xfs     defaults        0 0

#DB mounts
UUID=38a5b23b-b51e-4807-ad71-5afb59960b1a /db                     ext4    defaults        0 0
UUID=f2c5b96f-d543-4a3e-aebf-2f730d5050e3 /var/log                ext4    defaults        0 0
[ec2-user@ip-172-31-19-178 ~]$
Install MySQL
sudo yum update -y
sudo yum install mysql-server -y
sudo systemctl enable mysqld #start on boot
Check that MySQL is running
[ec2-user@ip-172-31-19-178 ~]$ sudo systemctl status mysqld
● mysqld.service - MySQL 8.0 database server
Loaded: loaded (/usr/lib/systemd/system/mysqld.service; disabled; vendor preset: disabled)
Active: inactive (dead)
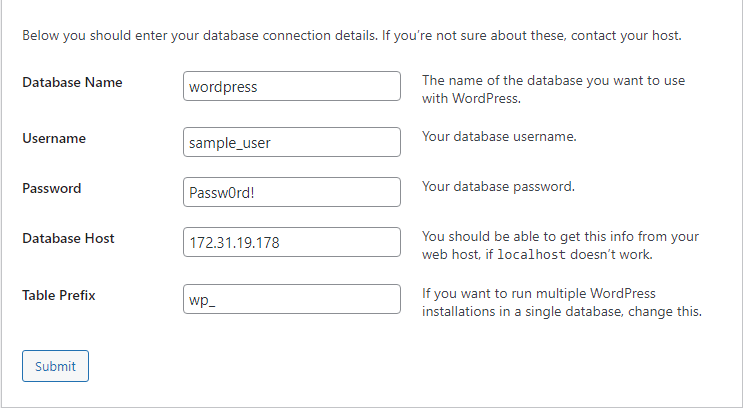
[ec2-user@ip-172-31-19-178 ~]$Now we will create a database wordpress and user sample_user with all permissions when connecting from Webserver (172.31.86.213)
sudo mysqld
mysql> CREATE DATABASE wordpress;
Query OK, 1 row affected (0.01 sec)

mysql> CREATE USER 'sample_user'@'172.31.86.213' IDENTIFIED BY 'Passw0rd!';
Query OK, 0 rows affected (0.00 sec)

mysql> GRANT ALL ON wordpress.* TO 'sample_user'@'172.31.86.213';
Query OK, 0 rows affected (0.00 sec)

mysql> FLUSH PRIVILEGES;
Query OK, 0 rows affected (0.01 sec)

mysql> SHOW DATABASES;
+--------------------+
| Database           |
+--------------------+
| information_schema |
| mysql              |
| performance_schema |
| sys                |
| wordpress          |
+--------------------+
5 rows in set (0.00 sec)
mysql> exit
Bye
Now we are going to add a rule to our Security Group to open TCP port 3306 but the source of the connection has to be from Webserver (in this case 172.31.86.213/32)
Use link:
Opening Ports in AWS

Testing connection from Webserver
[ec2-user@ip-172-31-86-213 ~]$ sudo mysql -u sample_user -p -h 172.31.19.178
Enter password:
Welcome to the MySQL monitor.  Commands end with ; or \g.
Your MySQL connection id is 11
Server version: 8.0.21 Source distribution

Copyright (c) 2000, 2020, Oracle and/or its affiliates. All rights reserved.

Oracle is a registered trademark of Oracle Corporation and/or its
affiliates. Other names may be trademarks of their respective
owners.

Type 'help;' or '\h' for help. Type '\c' to clear the current input statement.


mysql>
Configure WordPress to connect to remote database
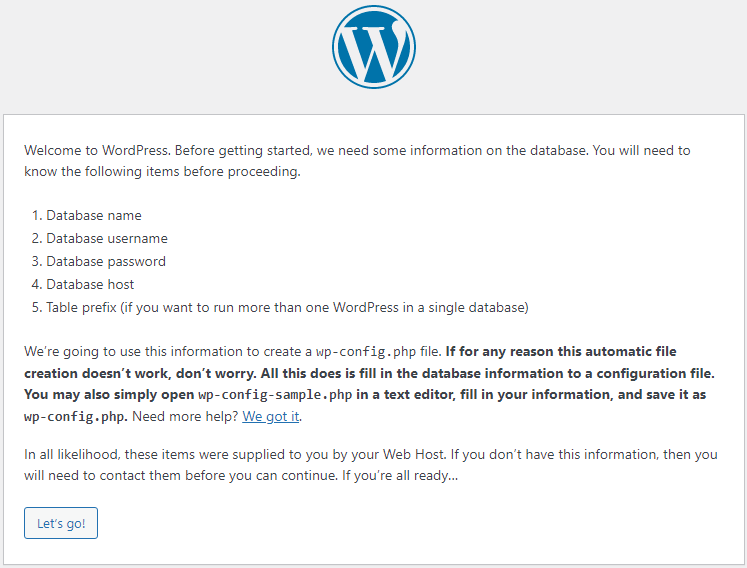
You can edit file wp-config.php or access wordpress from your broswer wich will generate this file after answering wizard like step by step questions