Module 5: VPC Creation Assignment
Problem Statement: Working for an organization, you are required to provide them a safe and secure environment for the deployment of their resources. They might require different types of connectivity. Implement the following to fulfill the requirements of the company.
Tasks To Be Performed:
- Create a VPC with 120.0.0.0/16 CIDR block.
- Create 1 public subnet 2 private subnets and make sure you connect a NAT gateway for internet connectivity to a private subnet.
1. Setting up the VPC:
- Access AWS Management Console: Open up my AWS Console and navigate to the VPC Dashboard.
- Begin VPC Creation: Click on “Your VPCs”, and then “Create VPC”.
- VPC Configuration:
- Name: I’ll label it for easy identification
Assignment1. - CIDR block: Input
120.0.0.0/16. - Clicked on “Create VPC” to finalize the VPC.
2. Defining Subnets:
2.1. Public Subnet:
- Initiate Subnet Creation: Under the VPC Dashboard, I’ll go to “Subnets” and select “Create subnet”.
- Configuration:
- VPC: Selected the VPC I just created
Assignment1.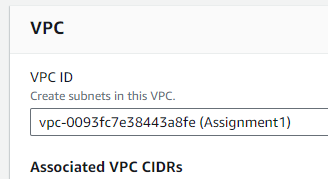
- Name: Labeled it “Public-Subnet”.
- CIDR block: Entered “120.0.0.0/24”.
- Availability Zone: Chose
us-east-1a.
- Finalize: Clicked “Create subnet”.
2.2. Private Subnets:
- First Private Subnet:
- Name: Label it “Private-Subnet-1”.
- CIDR block: Use “120.0.1.0/24”.
- Availability Zone: Chose
us-east-1b. Click “Create subnet”.
- Second Private Subnet:
- Name: Label it “Private-Subnet-2”.
- CIDR block: Use “120.0.2.0/24”.
- Availability Zone: Chose
us-east-1c. Click “Create subnet”.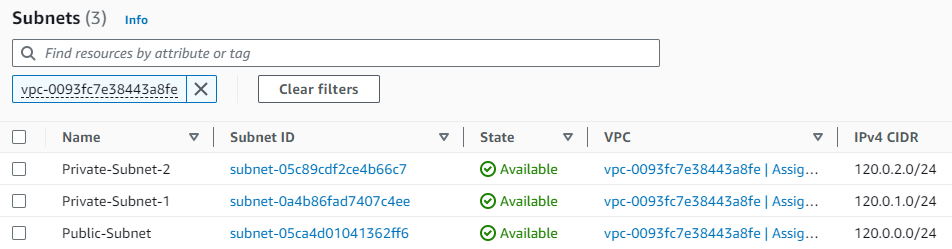
3. Facilitating Internet Access:
- Create Internet Gateway:
- Under “Internet gateways” in the VPC Dashboard, clicked “Create internet gateway”.
- Name: Label it for identification
Assignment1. - Attach: Attached this gateway to the VPC I created earlier.
- Update Route Table for Public Subnet:
- I’ll go to “Route tables”.
- Edit the route table associated with the public subnet.

- Add a rule to allow traffic to “0.0.0.0/0” through the internet gateway.

4. Ensuring Private Subnet Connectivity via NAT:
- NAT Gateway Creation:
- Navigated to “NAT Gateways” and clicked “Create NAT gateway”.
- Subnet: Place it in the public subnet for internet access.
- Allocate new EIP: To ensure the NAT gateway has a public IP allocated an Elastic IP by clicking
Allocate Elastic IP.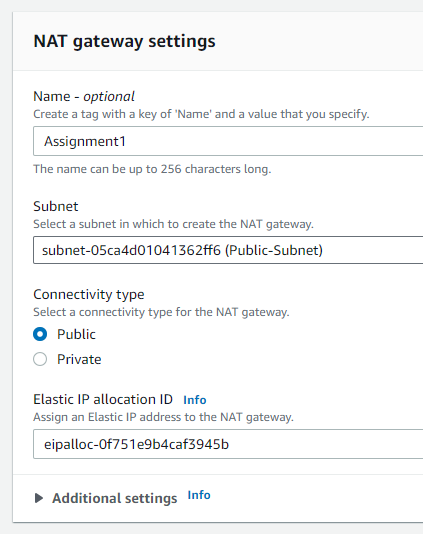
-
Update Private Subnet Route Table:
Observation: Both my public and private subnets are currently sharing the default route table that came bundled with the VPC. This isn’t the setup I want.
Intended Action: I’m going to isolate the private subnets by setting up a distinct route table for them. This way, I can manage their routing independently and maintain clarity in my VPC structure.
Steps I’ll Take:
- Craft a New Route Table for My Private Subnets:
-
I’ll head over to the VPC Dashboard.
-
I’ll click on “Route Tables” option on the left.
-
I’ll click “Create route table” button.
-
I’ll give it a descriptive name “PrivateSubnetsRouteTable”.
-
I’ll ensure it’s associated with my VPC by selecting it from the dropdown.
- Adjust the Route to Point to the NAT Gateway:
-
Now, in the details of this fresh route table, I’ll head to the “Routes” section.
-
I need to point all outbound traffic to the NAT gateway, so I’ll add a route:
-
For
Destination, I’ll enter0.0.0.0/0. -
For
Target, I’ll pick the NAT gateway from the list.
-
That’s done. I’ll save the changes.
- Link My Private Subnets to This New Table:
- Staying in the details of this route table, I’ll navigate to “Actions”.
- I’ll click on “Edit subnet associations” option.
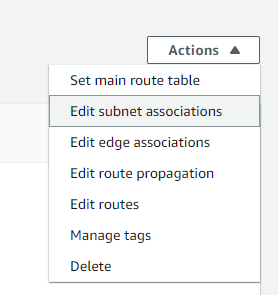
- From the list, I’ll tick the boxes next to my private subnets and click “Save associations”
Final Check
Before concluding, I’ll ensure all configurations are correct and perform a connectivity test from the private subnet, ensuring the NAT gateway is working as expected.
Initial Access to the Public Subnet Instance:
- I SSHed into the EC2 instance residing in the public subnet.
Connectivity Test to Private Instance:
Before attempting to ping the private instance, I realized that I needed to allow ICMP traffic to test the connection between the two instances.
I modified the security group of the private instance to allow inbound ICMP traffic from the public subnet’s IP range.
I successfully pinged the private subnet instance from my public instance:
[ec2-user@ip-120-0-0-226 ~]$ ping 120.0.2.139
64 bytes from 120.0.2.139: icmp_seq=170 ttl=127 time=1.06 ms
...
Preparing for SSH into Private Instance:
- To SSH into the private instance from the public instance, I needed the private key for the private instance.
- I securely transferred and stored this key temporarily on the public instance as
temp_key.SSH into the Private Subnet Instance:
- Using the transferred key, I initiated an SSH connection from the public instance to the private instance:
[ec2-user@ip-120-0-0-226 ~]$ ssh -i temp_key ec2-user@120.0.2.139
[ec2-user@ip-120-0-2-139 ~]$
Testing Internet Connectivity from Private Instance:
- To validate that the private instance had outbound internet access via the NAT gateway, I pinged Google’s public DNS server:
[ec2-user@ip-120-0-2-139 ~]$ ping 8.8.8.8
64 bytes from 8.8.8.8: icmp_seq=1 ttl=50 time=2.49 ms
...
- The successful ping confirmed that my private instance had correct outbound internet connectivity.