Module 6: S3 Bucket Versioning
Problem Statement: You work for XYZ Corporation. Their application requires a storage service that can store files and publicly share them if required. Implement S3 for the same.
Tasks To Be Performed:
- Enable versioning for the bucket created in task 1.
- Re-upload any 2 files already uploaded to verify if versioning works.
Background: I’ve already set up an S3 bucket my-test-bucket-unique-name and uploaded several files to it, including document.docx and image.jpg.
1. Enabling Versioning for My S3 Bucket:
Step 1: I logged into the AWS Management Console and navigated to the S3 dashboard.
Step 2: I clicked on the name of my existing bucket to access its contents.
Step 3: I then went to the “Properties” tab to adjust the settings.
Step 4: I found the “Versioning” section and clicked on “Edit”.
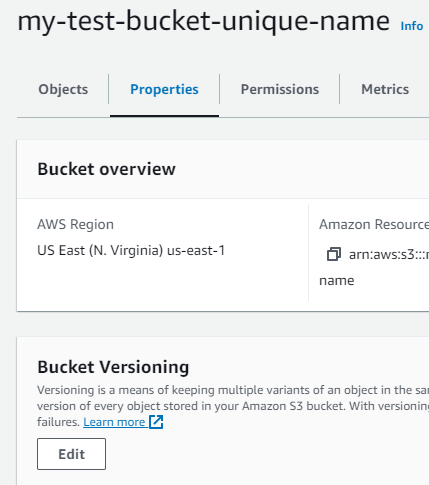
Step 5: I saw the option to enable versioning, so I toggled the switch to “Enable”.
Step 6: After confirming the change, I saved it to activate versioning for my bucket.
2. Re-uploading My Two Files to Verify Versioning:
Step 1: In my bucket, I pressed the “Upload” button to add files.
Step 2: I then selected document.docx and image.jpg from my computer, both of which I had previously modified.
Step 3: With the files ready, I clicked the “Upload” button to re-add them to the bucket.
3. Checking if Versioning Works:
Step 1: Curious to see if versioning worked, I clicked on the document.docx.
Step 2: I then navigated to the “Versions” tab in the file’s details.
Step 3: Just as I hoped, multiple versions of document.docx were listed, confirming the versioning feature was active.
Step 4: For good measure, I repeated the process with image.jpg and saw its multiple versions too.
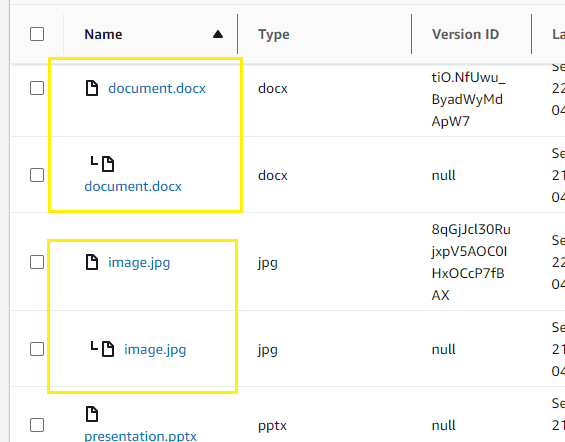
By following these steps, I successfully enabled versioning for my bucket and verified it worked by re-uploading and checking versions of my previously uploaded files.