Overview
In this lab I deployed Apache Tomcat 9 on a Red Hat Enterprise Linux 8 cloud server. The goal was to simulate a real-world scenario where a development team wants to evaluate Tomcat as their Java web application platform running on RHEL 8, a common enterprise environment.
By the end of this lab, Tomcat was fully installed, configured as a systemd service (so it automatically starts on reboot), and accessible via the web-based management console from the internet.
What this lab covers:
- Installing Java 11 OpenJDK as a runtime dependency
- Downloading and extracting the Tomcat 9 binary
- Creating a dedicated system user and setting proper file permissions
- Writing a
systemdservice unit file for process management - Configuring an admin user for the Tomcat Manager web console
- Opening remote access to the management UI
- Diagnosing and resolving a misconfiguration error in
context.xml
Environment
| Property | Value |
|---|---|
| OS | Red Hat Enterprise Linux 8 |
| Platform | Cloud-hosted VM |
| Tomcat Version | 9.0.117 |
| Java Version | OpenJDK 11 |
| Server User | cloud_user |
Step 1 - Install Java 11 OpenJDK
Tomcat is a Java-based application server, so the JDK must be installed first. I used dnf, the default package manager on RHEL 8, to install the development package which includes both the runtime and compiler toolchain.
sudo dnf install java-11-openjdk-develAfter installation, I verified the correct version was active on the system:
java -versionExpected output:
openjdk version "11.0.x" ...
OpenJDK Runtime Environment ...
OpenJDK 64-Bit Server VM ...
Why
java-11-openjdk-develand not justjava-11-openjdk? The-develvariant includes the full JDK (compiler + tools), not just the JRE. This is the recommended choice for a server that may also compile or run build tools, and it’s what Tomcat’s startup scripts expect.
Step 2 - Download Tomcat 9
Rather than installing from a package repository (which may carry an outdated version), I downloaded the official binary directly from the Apache Software Foundation. This ensures I’m working with a specific, known version, important in production environments.
I navigated to the Apache Tomcat 9 downloads page and grabbed the tar.gz link from the Core section under Binary Distributions, then downloaded it using wget:
wget https://dlcdn.apache.org/tomcat/tomcat-9/v9.0.117/bin/apache-tomcat-9.0.117.tar.gzExpected output:
--2026-04-28 13:30:00--  https://dlcdn.apache.org/tomcat/tomcat-9/v9.0.117/bin/apache-tomcat-9.0.117.tar.gz
Resolving dlcdn.apache.org... 151.101.x.x
Connecting to dlcdn.apache.org|151.101.x.x|:443... connected.
HTTP request sent, awaiting response... 200 OK
Length: 11234567 (10.7M) [application/x-gzip]
Saving to: 'apache-tomcat-9.0.117.tar.gz'

apache-tomcat-9.0.117.tar.gz  100%[===================>]  10.72M  5.43MB/s  in 2.0s
Step 3 - Extract and Configure Tomcat
3a. Extract the Archive
I elevated to root to perform installation steps, then changed to /usr/local, the standard Linux directory for locally installed software not managed by the package manager.
sudo su -
cd /usr/local
tar -xvf /home/cloud_user/apache-tomcat-9.0.117.tar.gz
I then renamed the extracted folder to a clean, version-agnostic name. This makes future upgrades easier since paths in config files and scripts won’t need to change.
mv apache-tomcat-9.0.117 tomcat93b. Create a Dedicated System User
Running services as root is a security risk. I created a dedicated system account (-r flag) with no login shell for Tomcat to run under. This limits the blast radius if the service is ever compromised.
useradd -r tomcatI then transferred ownership of the entire tomcat9 directory to this user:
chown -R tomcat:tomcat /usr/local/tomcat9Step 4 - Create a systemd Service Unit
Rather than starting Tomcat manually each time, I configured it as a systemd service. This means the OS manages it: it can be started, stopped, restarted, and will automatically come back up after a server reboot.
vim /etc/systemd/system/tomcat.serviceI added the following unit file content:
[Unit]
Description=Apache Tomcat
After=syslog.target network.target

[Service]
Type=forking
User=tomcat
Group=tomcat

Environment=CATALINA_PID=/usr/local/tomcat9/temp/tomcat.pid
Environment=CATALINA_HOME=/usr/local/tomcat9
Environment=CATALINA_BASE=/usr/local/tomcat9

ExecStart=/usr/local/tomcat9/bin/catalina.sh start
ExecStop=/usr/local/tomcat9/bin/catalina.sh stop

RestartSec=12
Restart=always

[Install]
WantedBy=multi-user.target
Key fields explained:
After=network.target- ensures Tomcat only starts once networking is upType=forking- tells systemd Tomcat forks a child process (the JVM) and exits the parentRestart=always- automatically restarts Tomcat if it crashesWantedBy=multi-user.target- enables the service for the standard multi-user runlevel
After saving the file, I reloaded systemd so it would recognize the new unit:
systemctl daemon-reloadThen started, enabled, and verified the service:
systemctl start tomcat.service
systemctl enable tomcat.service
systemctl status tomcat.service
Expected output:
● tomcat.service - Apache Tomcat
   Loaded: loaded (/etc/systemd/system/tomcat.service; enabled; vendor preset: disabled)
   Active: active (running) since Tue 2026-04-28 17:43:08 UTC; 7s ago
 Main PID: 14336 (java)
    Tasks: 34 (limit: 23392)
   Memory: 104.9M
   CGroup: /system.slice/tomcat.service
           └─14336 /usr/bin/java -Djava.util.logging.config.file=/usr/local/tomcat9/conf/logging.properties ...

Apr 28 17:43:07 tomcat systemd[1]: Starting Apache Tomcat...
Apr 28 17:43:08 tomcat systemd[1]: Started Apache Tomcat.
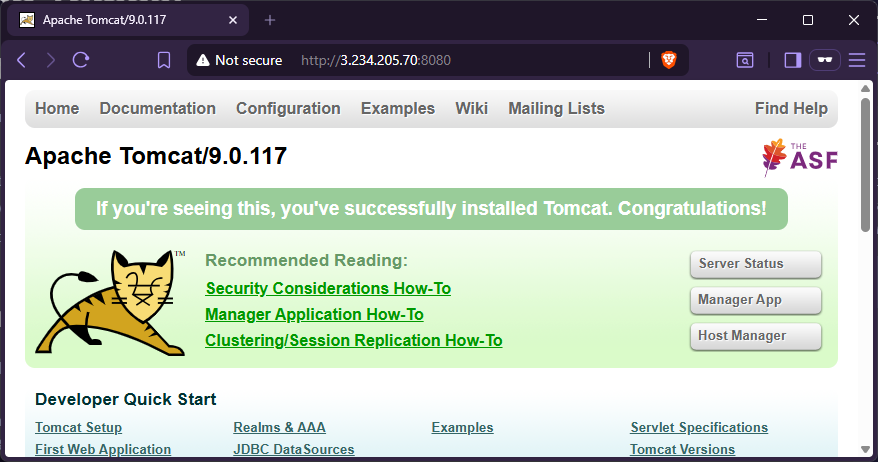
With the service running, I confirmed Tomcat was reachable in a browser on port 8080:
    #<PUBLIC_IP>
http://3.234.205.70:8080
A successful response shows the Tomcat default welcome page, confirming the service is up and the firewall is allowing traffic on port 8080.
Step 5 - Add an Admin User
By default, Tomcat’s Manager web console has no users defined. I added an admin account by editing tomcat-users.xml:
cd /usr/local/tomcat9
vim conf/tomcat-users.xml
I added the following just before the closing </tomcat-users> tag:
<role rolename="admin-gui"/>
<role rolename="manager-gui"/>
<user username="admin" password="Passw0rd!" roles="admin-gui,manager-gui"/>
Why separate role definitions?
Tomcat requires roles to be declared before they’re assigned. Definingadmin-guiandmanager-guias separate<role>entries first, then referencing them in the<user>block, is the cleaner and more explicit approach, especially useful if you later want to assign different roles to different users.
Step 6 - Enable Remote Access to the Manager Console
By default, Tomcat’s Manager app only allows connections from localhost. To access it remotely (e.g., from a browser over the internet), I needed to update the access control valve in the Manager’s configuration.
vim webapps/manager/META-INF/context.xmlI located the RemoteAddrValve entry and modified the allow pattern to permit all IP addresses:
Before:
allow="127\.\d+\.\d+\.\d+|::1|0:0:0:0:0:0:0:1" />After (using RemoteCIDRValve for CIDR-style allow rules):
<Valve className="org.apache.catalina.valves.RemoteCIDRValve"
       allow="0.0.0.0/0" />
Why
RemoteCIDRValveinstead ofRemoteAddrValve?
RemoteCIDRValveuses standard CIDR notation (0.0.0.0/0= allow all), which is cleaner and less error-prone than the regex-basedRemoteAddrValve. This came directly from troubleshooting, see the section below.
Step 7 - Restart and Verify
I restarted Tomcat to apply all configuration changes:
systemctl restart tomcatThen navigated back to the server’s public IP on port 8080, clicked Server Status, and logged in with the admin credentials from Step 5.
A successful login to the Manager dashboard confirms that:
- Tomcat is running correctly
- The admin user is properly configured
- Remote access rules are working
Troubleshooting - Invalid Regex / HTTP 404 on Manager Page
During this lab, two issues were encountered after modifying context.xml:
Issue 1 - HTTP 404 Not Found on /manager/status
After restarting Tomcat, navigating to http://3.234.205.70:8080/manager/status returned an HTTP 404 error. The instinct might be to assume the URL is wrong, but in this case the 404 didn’t mean “wrong path,” it meant the Manager application never deployed at all, so the path simply didn’t exist.
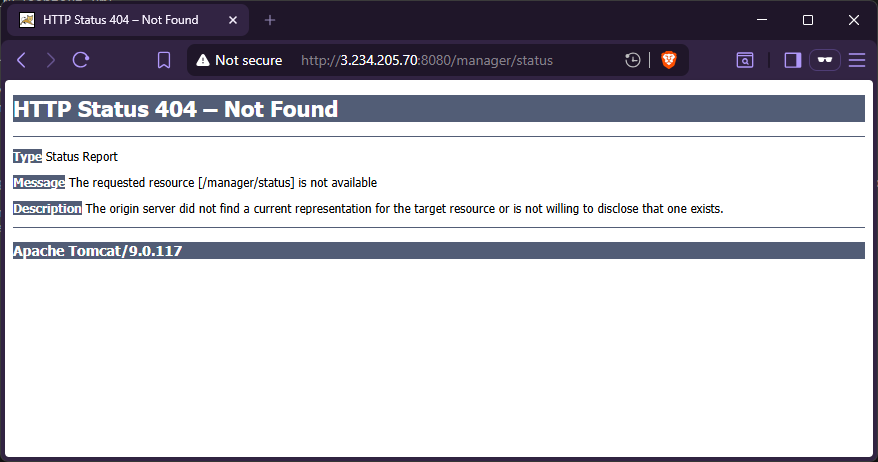
Here’s the chain of events that caused it:
- The
|.*pattern appended to theRemoteAddrValve’sallowregex was invalid, Tomcat’s valve parser rejected it. - This caused a
LifecycleExceptioninside the valve, which propagated up and crashed the Manager web application during startup. - Tomcat itself continued running fine (port 8080 still responded), but the Manager app failed silently from the browser’s perspective, leaving only a 404 at its path.
This is why checking the logs is essential. The browser only tells you something is missing; the logs tell you why it never loaded.
Issue 2 - RemoteAddrValve Lifecycle Exception
Checking the Tomcat logs confirmed the root cause:
sudo tail -50 /usr/local/tomcat9/logs/catalina.outCaused by: org.apache.catalina.LifecycleException: One or more invalid
configuration settings were provided for the Remote[Addr|Host]Valve which
prevented the Valve and its parent containers from starting
A further confirmation in the logs shows the Manager app “finishing” deployment immediately after the exception, meaning it completed in a failed state:
Deployment of web application directory [/usr/local/tomcat9/webapps/manager]
has finished in [26] ms
The allow regex pattern (with |.* appended to RemoteAddrValve) was rejected by Tomcat’s valve parser.
Fix: Switch from RemoteAddrValve (which uses regex) to RemoteCIDRValve (which uses standard CIDR notation) in context.xml:
<Valve className="org.apache.catalina.valves.RemoteCIDRValve"
       allow="0.0.0.0/0" />
This allows connections from any IPv4 address using clean CIDR syntax that Tomcat accepts without error.
Also ensure tomcat-users.xml defines roles and users on separate lines (not combined in one <role> tag):
<role rolename="admin-gui"/>
<role rolename="manager-gui"/>
<user username="admin" password="Passw0rd!" roles="admin-gui,manager-gui"/>
Key Takeaways
| Concept | What I Practiced |
|---|---|
| Dependency management | Installing Java as a prerequisite before the dependent application |
| Principle of Least Privilege | Running Tomcat under a dedicated, unprivileged system user |
| Process management | Writing a systemd unit file for automatic startup and crash recovery |
| Access control | Configuring Tomcat roles and users for web console authentication |
| Log-driven debugging | Using catalina.out to diagnose a service startup failure |
| Configuration hygiene | Replacing a fragile regex rule with a cleaner CIDR-based alternative |
Commands Reference
# Install Java
sudo dnf install java-11-openjdk-devel

# Download Tomcat
wget https://dlcdn.apache.org/tomcat/tomcat-9/v9.0.117/bin/apache-tomcat-9.0.117.tar.gz

# Extract and place
sudo su -
cd /usr/local
tar -xvf /home/cloud_user/apache-tomcat-9.0.117.tar.gz
mv apache-tomcat-9.0.117 tomcat9

# Create system user and set permissions
useradd -r tomcat
chown -R tomcat:tomcat /usr/local/tomcat9

# Service management
systemctl daemon-reload
systemctl start tomcat.service
systemctl enable tomcat.service
systemctl status tomcat.service
systemctl restart tomcat

# View logs for troubleshooting
sudo tail -50 /usr/local/tomcat9/logs/catalina.out