Part: 1 of 3
Topics: IAM Setup · AWS CLI · S3 · Terraform Installation · VPC · Subnets · Variables · Refactoring
Overview
In previous projects AWS Solution for 2 Company Websites using a Reverse Proxy I built AWS infrastructure for two websites manually through the console. The goal of this series is to automate that exact same setup using Terraform, an Infrastructure as Code (IaC) tool that lets you define, provision, and manage cloud resources through code instead of clicking through a UI.
This first article covers the foundational setup: creating a dedicated IAM user for Terraform, configuring the AWS CLI, creating an S3 bucket that will later be used as a remote backend in Part 3, installing Terraform, and writing the first configuration files to provision a VPC and public subnets. Along the way I refactor the code to eliminate hard-coded values and introduce variables, a critical best practice for maintainable infrastructure code.
Prerequisites
- An AWS account
python3andpipinstalled locally- Basic familiarity with the Linux terminal
Step 1 - Create a Dedicated IAM User for Terraform
Rather than using a root account or a personal IAM user, I create a dedicated terraform IAM user with programmatic-only access. This keeps Terraform operations isolated and auditable.
Navigate to: IAM → Users → Add Users
| Step | Setting | Value |
|---|---|---|
| 1 | User name | terraform |
| 1 | Credential type | Access key – Programmatic access |
| 2 | Group name | terraform |
| 2 | Policy | AdministratorAccess |
| 3 | Tag | Name = terraform |
⚠️ Important: At the final step of the IAM wizard (Review & Download), save the Access Key ID and Secret Access Key, these are only shown once.
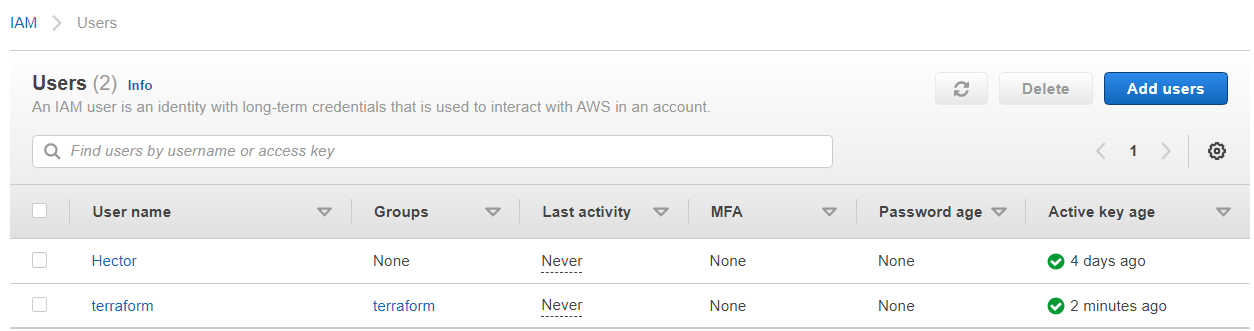
The result is two users visible in IAM: my personal user and the new terraform service user.
Step 2 - Install and Verify Dependencies
AWS CLI
I’ll use the AWS CLI to authenticate the terraform IAM user locally.
hector@hector-Laptop:~$ aws --version
aws-cli/1.22.71 Python/3.8.10 Linux/5.4.0-109-generic botocore/1.24.16
Step 3 - Configure AWS CLI Authentication
With the Access Key ID and Secret Access Key from Step 1, I configure the AWS CLI to authenticate as the terraform user.
hector@hector-Laptop:~$ aws configure
AWS Access Key ID [****************HQXB]: <your-access-key>
AWS Secret Access Key [****************equ5]: <your-secret-key>
Default region name [us-east-1]:
Default output format [None]:
This writes credentials to
~/.aws/credentials, which both the AWS CLI andboto3will use automatically.
Step 4 - Create an S3 Bucket
I create an S3 bucket now as a prerequisite, it will be configured as a remote Terraform backend with state locking in Part 3. For now it just needs to exist. Navigate to: Amazon S3 → Buckets → Create Bucket
| Setting | Value |
|---|---|
| Bucket name | hector-dev-terraform-bucket |
| AWS Region | us-east-1 |
| Tag | Name = hector-dev-terraform-bucket |

Verify AWS CLI Authentication
With credentials configured, I run a quick check to confirm the AWS CLI can authenticate and reach AWS:
hector@hector-Laptop:~$ aws s3 ls
2022-05-11 16:27:09 hector-dev-terraform-bucket
The bucket we just created comes back, credentials are working correctly.
Step 5 - Install Terraform
I download the Terraform binary, extract it, and move it into the system PATH so it’s available globally.
# Download the Terraform zip
hector@hector-Laptop:~/Project16-17$ sudo wget https://releases.hashicorp.com/terraform/1.1.9/terraform_1.1.9_linux_amd64.zip

# Verify the download
hector@hector-Laptop:~/Project16-17$ ls
PBL  README.md  terraform_1.1.9_linux_amd64.zip

# Extract the binary
hector@hector-Laptop:~/Project16-17$ sudo unzip terraform_1.1.9_linux_amd64.zip
Archive:  terraform_1.1.9_linux_amd64.zip
  inflating: terraform

# Move it to the system bin directory
hector@hector-Laptop:~/Project16-17$ sudo mv terraform /usr/local/bin/

# Confirm the installation
hector@hector-Laptop:~/Project16-17$ terraform -v
Terraform v1.1.9
on linux_amd64
Step 6 - Write the First Terraform Configuration
The working directory is PBL/, which starts with a single file: main.tf.
Define the AWS Provider and VPC
The provider block tells Terraform which cloud platform to use. The resource block defines the actual infrastructure, in this case a VPC.
# Provider block - instructs Terraform to build in AWS
provider "aws" {
  region = "us-east-1"
}

# Resource block - creates a VPC
resource "aws_vpc" "main" {
  cidr_block                     = "10.0.0.0/16"
  enable_dns_support             = "true"
  enable_dns_hostnames           = "true"
  enable_classiclink             = "false"
  enable_classiclink_dns_support = "false"
}
Initialize Terraform
Before running any commands, Terraform needs to download the AWS provider plugin. This is done once per working directory with terraform init.
hector@hector-Laptop:~/Project16-17/PBL$ terraform initOutput
Initializing the backend...

Initializing provider plugins...
- Finding latest version of hashicorp/aws...
- Installing hashicorp/aws v4.13.0...
- Installed hashicorp/aws v4.13.0 (signed by HashiCorp)

Terraform has created a lock file .terraform.lock.hcl to record the provider
selections it made above. Include this file in your version control repository
so that Terraform can guarantee to make the same selections by default when
you run "terraform init" in the future.

Terraform has been successfully initialized!
A .terraform/ directory is created to store the downloaded plugins. It’s safe to delete and recreate by running terraform init again.
hector@hector-Laptop:~/Project16-17/PBL$ ls -a
.  ..  main.tf  .terraform  .terraform.lock.hcl
The
.terraform.lock.hclDependency Lock File pins the exact provider version used, commit this to source control.
Plan and Apply
Before creating anything, I preview what Terraform intends to do:
terraform plan   # Shows what will be created/modified/destroyed
terraform apply  # Executes the plan
After a successful apply, two new files appear:
hector@hector-Laptop:~/Project16-17/PBL$ ls
main.tf terraform.tfstate terraform.tfstate.backup| File | Purpose |
|---|---|
terraform.tfstate | Tracks the exact current state of all provisioned resources |
terraform.tfstate.backup | Previous state, used for rollback |
terraform.tfstate.lock.info | Temporary lock file while Terraform is running, prevents concurrent modifications |
Step 7 - Add Public Subnets
With the VPC in place, I add two public subnets to main.tf:
# Create public subnet 1
resource "aws_subnet" "public1" {
  vpc_id                  = aws_vpc.main.id
  cidr_block              = "10.0.1.0/24"
  map_public_ip_on_launch = true
  availability_zone       = "us-east-1a"
}

# Create public subnet 2
resource "aws_subnet" "public2" {
  vpc_id                  = aws_vpc.main.id
  cidr_block              = "10.0.3.0/24"
  map_public_ip_on_launch = true
  availability_zone       = "us-east-1b"
}
Running terraform plan and terraform apply provisions both subnets. But this code has two problems that need to be addressed.
Step 8 - Refactoring: Removing Hard-Coded Values
Problem 1: Hard-Coded Values
The availability_zone and cidr_block arguments are hard-coded strings. Any infrastructure change requires editing the code directly, this is fragile and not reusable.
Fix - Introduce Variables
I replace all hard-coded values with variable declarations. The provider block becomes:
variable "region" {
  default = "us-east-1"
}

provider "aws" {
  region = var.region
}
And the VPC block follows the same pattern for every argument:
variable "vpc_cidr"                    { default = "10.0.0.0/16" }
variable "enable_dns_support"          { default = "true" }
variable "enable_dns_hostnames"        { default = "true" }
variable "enable_classiclink"          { default = "false" }
variable "enable_classiclink_dns_support" { default = "false" }

resource "aws_vpc" "main" {
  cidr_block                     = var.vpc_cidr
  enable_dns_support             = var.enable_dns_support
  enable_dns_hostnames           = var.enable_dns_hostnames
  enable_classiclink             = var.enable_classiclink
  enable_classiclink_dns_support = var.enable_classiclink_dns_support
}
Problem 2: Multiple Resource Blocks for Subnets
Having a separate resource block for every subnet doesn’t scale. If I need 6 subnets I’d need 6 blocks. The fix is to use a loop and a data source.
Step 1 - Fetch Availability Zones Dynamically
Instead of hard-coding us-east-1a, I pull the list of available AZs directly from AWS:
data "aws_availability_zones" "available" {
  state = "available"
}
Step 2 - Use count to Loop
The count argument tells Terraform to create multiple copies of a resource. Combined with count.index, each iteration picks a different AZ from the list:
resource "aws_subnet" "public" {
  count                   = 2
  vpc_id                  = aws_vpc.main.id
  cidr_block              = "10.0.1.0/24"    # ⚠️ Still hard-coded, will fail on second loop
  map_public_ip_on_launch = true
  availability_zone       = data.aws_availability_zones.available.names[count.index]
}
data.aws_availability_zones.available.names returns something like:
["us-east-1a", "us-east-1b", "us-east-1c", ...]
So names[0] = us-east-1a, names[1] = us-east-1b, and so on.
Step 3 - Make cidr_block Dynamic with cidrsubnet()
The same CIDR block can’t be assigned to two subnets in the same VPC. The built-in cidrsubnet() function solves this by computing a unique CIDR for each loop iteration.
cidrsubnet(prefix, newbits, netnum)
| Parameter | Meaning |
|---|---|
prefix | Base CIDR in notation (e.g. 10.0.0.0/16) |
newbits | How many bits to extend the prefix by |
netnum | Which subnet number to generate |
Testing in the Terraform console:
hector@hector-Laptop:~$ terraform console
> cidrsubnet("172.16.0.0/16", 4, 0)
"172.16.0.0/20"
The updated subnet block with dynamic CIDR:
resource "aws_subnet" "public" {
  count                   = 2
  vpc_id                  = aws_vpc.main.id
  cidr_block              = cidrsubnet(var.vpc_cidr, 4, count.index)
  map_public_ip_on_launch = true
  availability_zone       = data.aws_availability_zones.available.names[count.index]
}
Step 4 - Remove the Hard-Coded count Value
The final hard-coded value is the count = 2. I replace it with a variable and a conditional using the length() function:
variable "preferred_number_of_public_subnets" {
  default = 2
}
resource "aws_subnet" "public" {
count = var.preferred_number_of_public_subnets == null ? length(data.aws_availability_zones.available.names) : var.preferred_number_of_public_subnets
vpc_id = aws_vpc.main.id
cidr_block = cidrsubnet(var.vpc_cidr, 4, count.index)
map_public_ip_on_launch = true
availability_zone = data.aws_availability_zones.available.names[count.index]
}Breaking down the condition:
| Part | Meaning |
|---|---|
var.preferred_number_of_public_subnets == null | Is the variable unset? |
? length(data.aws_availability_zones.available.names) | If yes, create one subnet per available AZ |
: var.preferred_number_of_public_subnets | If no, use the number we defined |
This means if you don’t specify a preference, Terraform will automatically create one subnet per AZ in the region.
Step 9 - Separating Variables into Their Own Files
Having all variable declarations inside main.tf becomes messy as the project grows. I split things into dedicated files.
File structure after refactoring:
hector@hector-Laptop:~/Project16-17/PBL$ tree
.
├── main.tf
├── terraform.tfstate
├── terraform.tfstate.backup
├── terraform.tfvars
└── variables.tf
0 directories, 5 filesmain.tf - contains only provider and resource blocks (no variable declarations):
main.tf
data "aws_availability_zones" "available" {
state = "available"
}
provider "aws" {
region = var.region
}
resource "aws_vpc" "main" {
cidr_block = var.vpc_cidr
enable_dns_support = var.enable_dns_support
enable_dns_hostnames = var.enable_dns_hostnames
enable_classiclink = var.enable_classiclink
enable_classiclink_dns_support = var.enable_classiclink_dns_support
}
resource "aws_subnet" "public" {
  count  = var.preferred_number_of_public_subnets == null ? length(data.aws_availability_zones.available.names) : var.preferred_number_of_public_subnets
  vpc_id = aws_vpc.main.id
  cidr_block              = cidrsubnet(var.vpc_cidr, 4, count.index)
  map_public_ip_on_launch = true
  availability_zone       = data.aws_availability_zones.available.names[count.index]
}variables.tf - all variable declarations with types and descriptions:
variables.tf
variable "region"                          { default = "us-east-1" }
variable "vpc_cidr"                        { default = "10.0.0.0/16" }
variable "enable_dns_support"              { default = "true" }
variable "enable_dns_hostnames"            { default = "true" }
variable "enable_classiclink"              { default = "false" }
variable "enable_classiclink_dns_support"  { default = "false" }
variable "preferred_number_of_public_subnets" { default = null }
terraform.tfvars - actual values for each variable. This is the only file you need to change to adjust the configuration:
terraform.tfvars
region                              = "us-east-1"
vpc_cidr                            = "10.0.0.0/16"
enable_dns_support                  = "true"
enable_dns_hostnames                = "true"
enable_classiclink                  = "false"
enable_classiclink_dns_support      = "false"
preferred_number_of_public_subnets  = 2
Running terraform plan with this structure confirms everything works correctly. The separation of concerns means you can hand terraform.tfvars to someone else to customize without them needing to touch the core resource logic.
Summary
By the end of this project the foundation is solid:
- ✅ A dedicated IAM
terraformuser with programmatic-only access - ✅ AWS CLI configured and verified with
boto3 - ✅ An S3 bucket created (to be configured as a remote backend in Part 3)
- ✅ Terraform installed and initialized against the
PBL/directory - ✅ A VPC and 2 public subnets provisioned via Terraform
- ✅ Code refactored to use variables, data sources, loops, and dynamic CIDR generation
- ✅ Configuration split across
main.tf,variables.tf, andterraform.tfvars
Part 2 picks up from here and builds out the full AWS stack: networking (Internet Gateway, NAT Gateway, Route Tables), IAM roles, Security Groups, Load Balancers, Auto Scaling Groups, EFS, and RDS.
GitHub Repository: AUTOMATE-INFRASTRUCTURE-WITH-IAC-USING-TERRAFORM